It is hard to talk about virtualisation without talking about KVM.
KVM (Kernel-based Virtual Machine) is a Type-I hypervisor commonly used as an accelerator for various virtual machines managers.
In this lab we will set up a barebone virtual machine with qemu (which uses KVM) to understand all the necessary components that a VM needs.
To avoid polluting personal files, we'll run all those vms in SWITCHengines VM with a concept called "nesting" (using a form of virtualisation inside a virtual machine). However, we'll pretend that we're running on a barebones machine.
We will:
- Setup the host machine
- Install qemu and start our first virtual machine
- Get deeper into explanation of parameters for qemu
- Create multiple vm to deploy the guestbook in a Multi-VM Deployment
First of all, as seen in class and in the "ssh tutorial part" create a bigger virtual machine on SWITCHengines with following settings:
When the server is up, we ssh into it to start doing commands.
$ ssh debian@xxx.xxx.xxx.xxx
Replace the ip with the one provided by SWITCHengines
After opening the remote session we use a command to verify that our system is compatible for kvm :
$ grep --color -E "vmx|svm" /proc/cpuinfo
If vmx or svm appears in red, that means our system is compatible.

We're almost ready so let's synchronize the package list.
$ sudo apt update # updates packages list
Now we'll install a few packages that we need for the next steps.
$ sudo apt install nano qemu qemu-system qemu-utils bridge-utils isc-dhcp-server iptables nmap -y
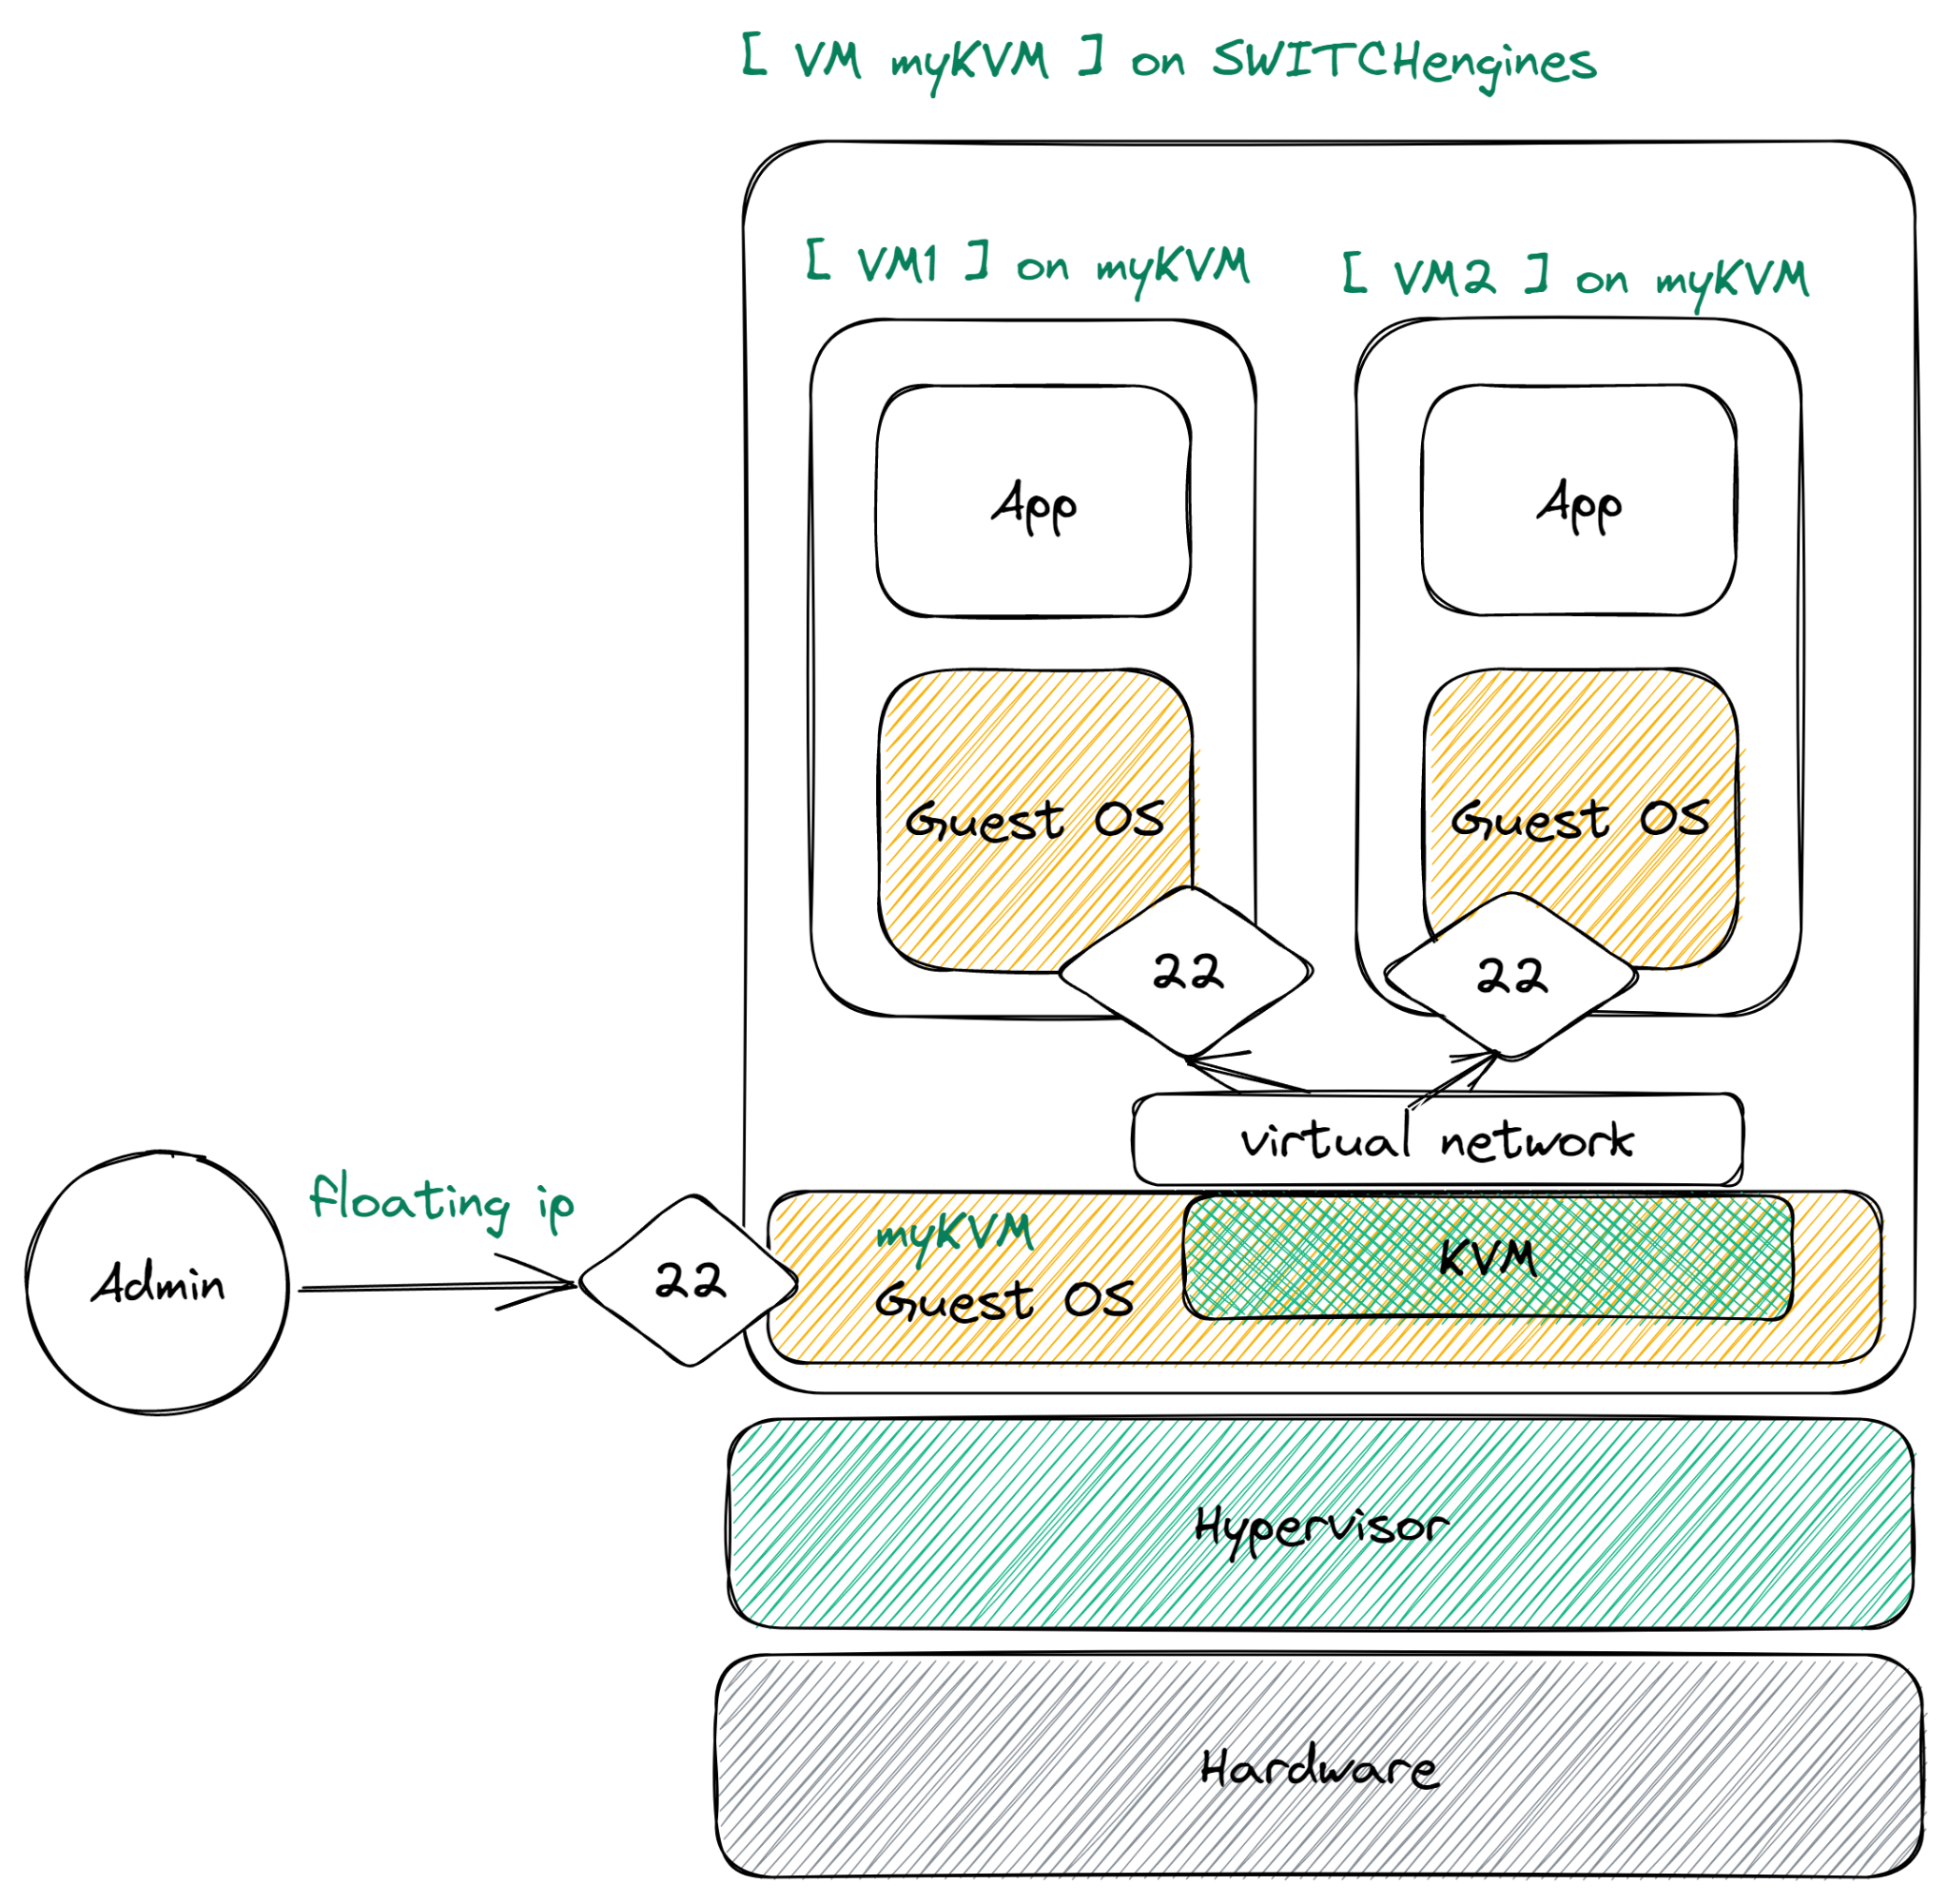
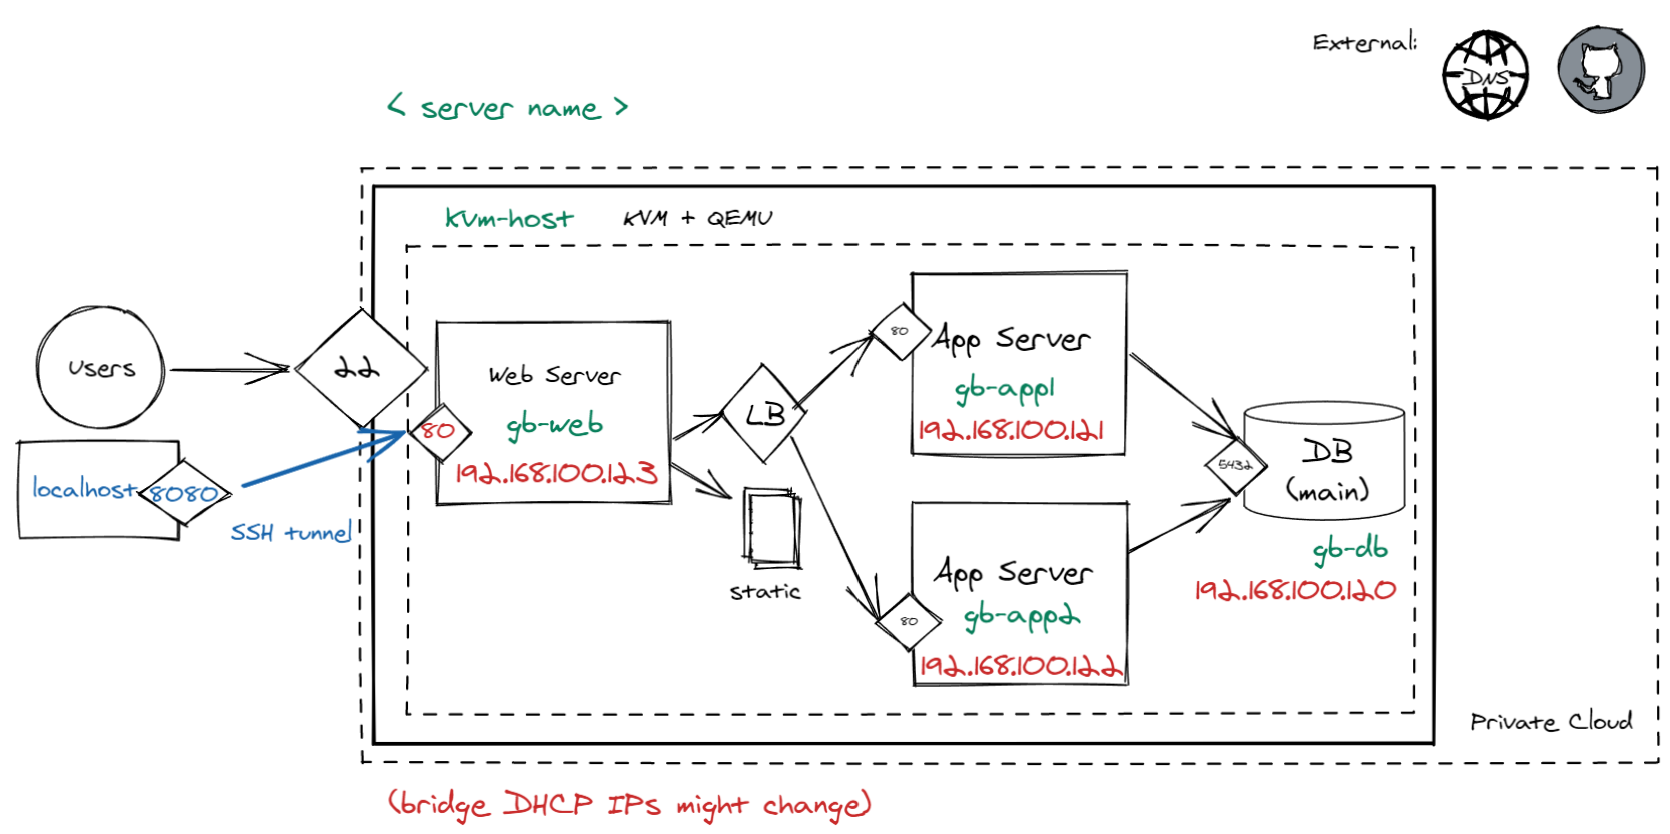
The end goal of this lab is to have the following structure :
The first step is to configure the virtual network on which we can connect our virtual machines. We want them to be interconnected, able to communicate with the host and also have access to the internet. Those requirements perfectly fit what a bridge can do, so we'll create one.
We can create a bridge by adding its definition to the network interfaces file.
$ sudo nano /etc/network/interfaces
Add a new entry at the end of this almost empty file
/etc/network/interfaces
# My Cool Bridge
auto vmbr0
iface vmbr0 inet static
    address 192.168.100.1/24
    bridge-ports none
    bridge-stp off
    bridge-fd 0

    # Allow ip forwarding
    post-up echo 1 > /proc/sys/net/ipv4/ip_forward
    # Masquerade, pass the bridge network to the real interface
    post-up iptables -t nat -A POSTROUTING -s '192.168.100.0/24' -o ens3 -j MASQUERADE
    # Remove the masquerade when the bridge is downed
    post-down iptables -t nat -D POSTROUTING -s '192.168.100.0/24' -o ens3 -j MASQUERADE
Save and then exit the file (CTRL + s -> CTRL + x)
You should now be able to bring up the interface
$ sudo ifup vmbr0
Now we have a bridge, but by itself you will not be allowed to use it, so we need to allow the current user (yes even if you use sudo) to use this bridge with qemu, so we create a basic qemu bridge config. The following lines assume that the current user is "debian" otherwise change debian to your user
$ sudo mkdir /etc/qemu
$ echo include /etc/qemu/debian.conf | sudo tee /etc/qemu/bridge.conf
$ echo allow all | sudo tee /etc/qemu/debian.conf
$ sudo chown root:debian /etc/qemu/debian.conf
$ sudo chmod 640 /etc/qemu/debian.conf
Great, now we have a bridge and we're allowed to use it !
Every VM that connects to the virtual network will need to configure their ip, routes, nameservers, etc. But we don't want to do that to that in every VM so in the next step we'll setup a DHCP Server
So, we want a dhcp server, we don't want anything fancy and we already installed a dhcp server in the setup step. So now it is time to configure it.
We want the dhcp server to run on the bridge we created in the previous step, so let's edit /etc/default/isc-dhcp-server
$ sudo sed -i "s/INTERFACESv4=\"\"/INTERFACESv4=\"vmbr0\"/" /etc/default/isc-dhcp-server
Dhcp will now give network configurations to devices connected on the vmbr0 bridge.
But what kind of network configuration ? well it's time to create one.
Open the configuration file
$ sudo nano /etc/dhcp/dhcpd.conf
We want our VMs to have access to a nameserver (DNS), we're going to use one provided by cloudflare at ipv4:: 1.0.0.1
First find an option that says
/etc/dhcp/dhcpd.conf
option domain-name-servers ns1.example.org, ns2.example.org;Replace it with this line
option domain-name-servers 1.0.0.1;Now we need to configure the subnet of the IPs which will be distributed by the server.
Write the following snippet below the previous line :
/etc/dhcp/dhcpd.conf
subnet 192.168.100.0 netmask 255.255.255.0 {
    range 192.168.100.120 192.168.100.200;
    option routers 192.168.100.1;
}
This snippet indicates the subnet, the range of ip addresses and the gateway that will be given to the VMs that will be connected on the bridge.
Restart the dhcp server
$ sudo systemctl restart isc-dhcp-server
Our network is now ready to accommodate our virtual machines.
So what if SWITCHengines, or Google Cloud or any of the others did not exist and we had to handle everything ourselves? Well many of those technologies use QEMU and KVM in the background so why not use these ourselves to see how it works.
QEMU (Quick EMUlator) is a virtualization suite (in addition to being a hardware emulator but that does not interest us for now) that is used with KVM to run virtual machines with very little overhead.
Just like on SWITCHengines or other services, we will connect to the machines we create with SSH. Since in this scenario, the host is the VM we created, we will create a new key for this host and we will configure the new VM inside it to accept this key (instead of using your own key).
$ ssh-keygen # accept every default answer with ENTER key
$ cat ~/.ssh/id_rsa.pub # this will display the public key that you can now copy
Copy that key by selecting it on the terminal then right-click -> Copy. Ctrl-C will not work ! Keep that public key somewhere.
To skip the normal installation of a system we take an image ready to be used, also called cloud-init.
$ sudo wget https://cloud.debian.org/images/cloud/bullseye/20230124-1270/debian-11-nocloud-amd64-20230124-1270.qcow2 -O debian.qcow2
We can then use this image as a virtual machine with the help of qemu
$ sudo qemu-system-x86_64 -m 512M -smp cpus=1 --enable-kvm -nographic -nic bridge,br=vmbr0 ./debian.qcow2
Let's break down the options :
qemu-system-x86_64 is part of the qemu virtualization suite. It launches a virtual machine.
Those are basic options to run a simple virtual machine with QEMU.
As you can see, even a simple machine requires a lot of options, and that's without going into more complicated setups. Also you may ask yourself : "Do I need to specify all the vm options ? Is there no virtual machine file configuration ?" And you are right, this is low level management, there is no configuration file all the hardware options must be specified everytime.
It is time to use our newly created vm.
With the previous command you now should have a login terminal asking for username and if entered a password

Username : root
No password, it should automatically log you in.
This image is a cloud-init image of the "nocloud" variant and as such it is very barebones.
Now we're going to prepare the virtual machine.
When you create a machine with openstack, you basically have to prepare nothing. All configuration is mostly taken care of by cloud-init. But as said before, we do not have cloud-init, and as such we'll prepare everything ourselves.
A first step is to just synchronize the mirrors with the providers, this will be important for the next steps :
$ apt update
Preparing the ssh server
Right now we are using the new VM from terminal (as we would be connected on a physical computer), but we want to use remote ssh, just like how we are using the host vm at the moment. By default the ssh server daemon (called sshd) is not launched on a nocloud image. You can try starting it up by entering the following command.
$ /usr/sbin/sshd
Oops, it will probably fail with the following message :
sshd: no hostkeys available -- exiting.
Usually cloud-init should take care of this, but since we're doing things the hard way, we need to generate the keys ourselves.
$ cd /etc/ssh
$ ssh-keygen -A
We can now start the ssh daemon, but this time we will use a service.
$ systemctl start sshd
NOTE : you may receive an error message that says : unable to resolve host debian: Name or service not known. You can safely ignore it.
Check that the sshd service is started up :
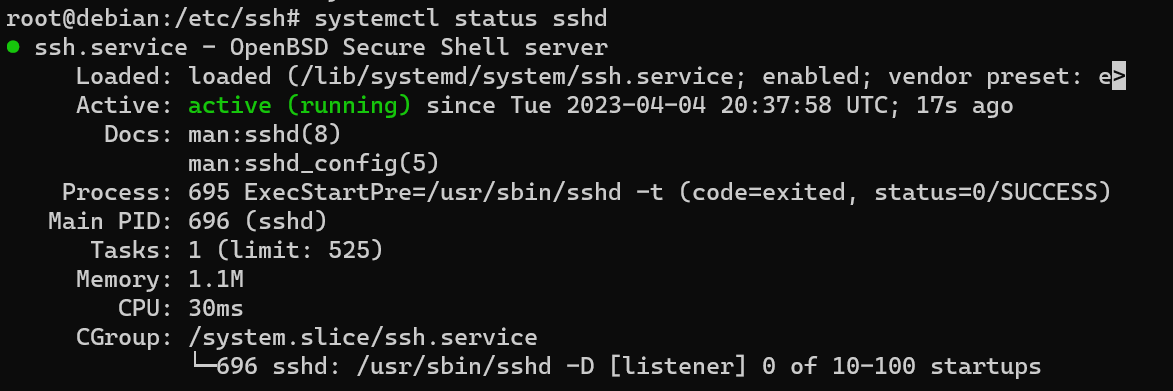
$ systemctl status sshd
You should see an "active" value in the "active" field.
To be able to connect to it through ssh we need to add the host user public key to the authorized files. Once again a step that would be done by the cloud init.
$ mkdir -p ~/.ssh
$ nano ~/.ssh/authorized_keys
And now paste the key you saved during the previous steps with right-click to paste
Save and exit nano
Changing the hostname
The base hostname is not very descriptive, it can become confusing when we will start using multiple machine so we should change it to something clearer, and while we're at it, let's save the ip address for later:
$ hostnamectl set-hostname hearc-labo-vm
$ ip a | grep ens3 | grep inet # Write down the Ip address gathered from this line
# then we turn off the vm
$ poweroff
Then we turn off the vm
$ poweroff
From your KVM-host start the QUEM vm
Now let's try to start it in the background and connect to it :
$ sudo qemu-system-x86_64 ./debian.qcow2 \
-m 512M -smp cpus=1 --enable-kvm \
-nic bridge,br=vmbr0 \
-nographic < /dev/null > ./vm.out &
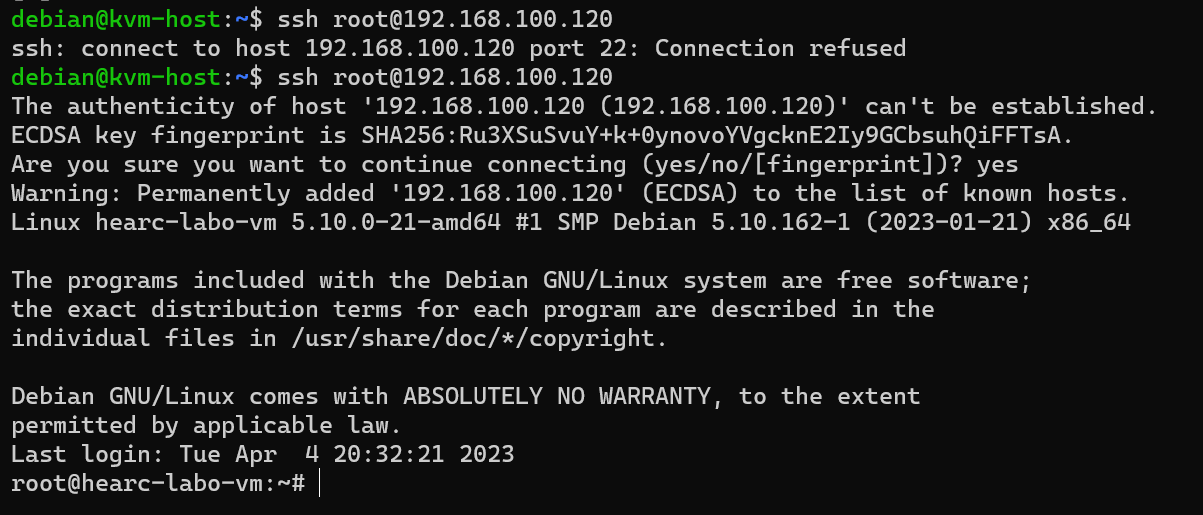
After a minute or so, you should be able to connect to the virtual machine in the following way :
$ ssh root@<previouslynotedip>
We now have a functional virtual machine, all ready and prepared to be used. So let's power off this one (your current nested vm: hearc-labo-vm).
$ poweroff
Remember your previous guestbook deployment ? well you know what you have to do next.
In this part, we're going to deploy the guestbook on a 4 VMs infrastructure
- One machine will have a postgresql database
- One machine will have a nginx front doing load balancing
- Two machines will have the guestbook application server
Since they will all connect to the same bridge on the host, they will be able to communicate with each other on the internal network.
To connect to it from outside we will use a SSH tunnel. For production, we could port-forward port 80 from kvm-host to port 80 of the internal nginx web vm machine.
First let's use the vm we prepared in the previous step as a template
$ sudo cp ./debian.qcow2 ./gb-db.qcow2
As we established earlier, this is only the disk image, the hardware configuration of the vm will still need to be specified everytime we start a vm.
Start it up with the terminal actif (login with root, no password)
$ sudo qemu-system-x86_64 ./gb-db.qcow2 \
-m 512M -smp cpus=1 --enable-kvm \
-nic bridge,br=vmbr0,mac=52:54:00:12:34:56 \
-nographic
Let's directly start by changing the hostname
$ hostnamectl set-hostname gb-db
Install postgresql :
$ apt-get -y install postgresql
Allowing external access is done by listening to the external network interface and allowing connection from it.
$ nano /etc/postgresql/13/main/postgresql.conf
Using nano, a simple cli text editor (you can use any other if you want) look for a line that says :
postgresql.conf
#listen_addresses = ‘localhost'Replace this with:
listen_addresses = ‘*'This tells postgresql to also listen to outside connections. You can safely save and close the file. (Use ctrl+s to save in nano and ctrl+x to close nano)
We also want to allow any authentication method to the database, edit the file called pg_hba.conf
$ nano /etc/postgresql/13/main/pg_hba.conf
At the end of the file add the following line :
pg_hba.conf
host all all all trustThe database will now accept any connection, but it still needs an actual database and a user. Use the following commands to initialize the database:
$ cd /
$ su postgres -c "createdb guestbook"
$ su postgres -c "psql -d guestbook -c \"CREATE USER guestbook WITH ENCRYPTED PASSWORD 'guestbook'\""
$ su postgres -c "psql -d guestbook -c \"GRANT ALL PRIVILEGES ON DATABASE guestbook TO guestbook\""
And now that everything is set up nicely, restart the database :
$ systemctl restart postgresql
And turn off this machine
$ poweroff
First, let's make a new vm from our template
$ sudo cp ./debian.qcow2 ./gb-app1.qcow2
start it up
$ sudo qemu-system-x86_64 ./gb-app1.qcow2 \
-m 512M -smp cpus=1 --enable-kvm \
-nic bridge,br=vmbr0,mac=52:54:00:12:34:57 \
-nographic
Login with root and change the hostname
$ hostnamectl set-hostname gb-app1
We will install the guestbook as a service as before in "C04b Production Ready Guestbook on a VM with SSL" focus on the guestbook part "Production App".
As usual, install what you need :
$ apt-get install -y python3 python3-pip python3-venv git
Clone the repo and change directory to get in 02_mvp_modules_sqlite3. We'll use this module as a base to configure it further :
$ git clone https://github.com/bfritscher/guestbook-src.git
$ cd guestbook-src/02_mvp_modules_sqlite3
Before continuing, a small difference from C04b, we're going to configure the application so that it uses our postgresql server instead of an internal database
To switch to PostgreSQL we only need to set the correct environment variable.
Use the previously noted ip address of the postgresql server (instead of [postgresqlvmIP]) .
$ cp .env.sample .env
$ nano .env
Change DB_HOST=localhost to DB_HOST=[postgresqlvmIP]
And make sure that GUESTBOOK_SERVICE=postgres is set.
$ python3 -m venv env
$ source env/bin/activate
$ pip3 install --upgrade -r requirements.txt
$ pip3 install gunicorn # adding gunicorn to the mix
Use this modified service file, we're running as root so we can omit the user and group fields. Do adapt the paths if needed to the project though :
/etc/systemd/system/gunicorn-gb.service
[Unit]
Description=Gunicorn instance to serve project
After=network.target

[Service]
WorkingDirectory=/root/guestbook-src/02_mvp_modules_sqlite3
Environment="PATH=/root/guestbook-src/02_mvp_modules_sqlite3/env/bin"
ExecStart=/root/guestbook-src/02_mvp_modules_sqlite3/env/bin/gunicorn --workers 1 --threads 8 --bind 0.0.0.0:80 -m 007 app:app

[Install]
WantedBy=multi-user.target
Don't forget to enable it so that it runs on boot
$ systemctl daemon-reload
$ systemctl enable gunicorn-gb
When it is ready, poweroff !
$ poweroff
Second Copy
Now, you can just copy this vm to directly create the second one !
$ sudo cp ./gb-app1.qcow2 ./gb-app2.qcow2
Start it up
$ sudo qemu-system-x86_64 ./gb-app2.qcow2 \
-m 512M -smp cpus=1 --enable-kvm \
-nic bridge,br=vmbr0,mac=52:54:00:12:34:58 \
-nographic
Login with root to change the hostname
$ hostnamectl set-hostname gb-app2
And turn it off, the app is already ready on this one.
$ poweroff
Since we have two applications machines, we want the connections to be load balanced between the two. We'll configure nginx with a load balancing function and to make it a bit more complicated and realistic, we'll serve the static files from the nginx machine.
Once again, let's use the previously created template
$ sudo cp ./debian.qcow2 ./gb-web.qcow2
Start the virtual machine
$ sudo qemu-system-x86_64 ./gb-web.qcow2 \
-m 512M -smp cpus=1 --enable-kvm \
-nic bridge,br=vmbr0,mac=52:54:00:12:34:59 \
-nographic
Login and set the hostname
$ hostnamectl set-hostname gb-web
And now prepare nginx just like in the previous guestbooks.
$ sudo apt install nginx git -y
We also need the project because we will serve static files from here.
$ cd /
$ git clone https://github.com/bfritscher/guestbook-src.git
Configure the nginx in a new and interesting way.
Instead of pointing at one app, nginx will point at two, this is called load-balancing.
Let's scrap the entire default config and replace it with our own.
$ rm /etc/nginx/sites-enabled/default
$ nano /etc/nginx/sites-enabled/default
Add an upstream block, this will declare the servers that are going to be load balanced and a server block, to configure the routing.
You will need the ips of the guestbooks you just made.
/etc/nginx/sites-enabled/default
upstream backend {
    server 192.168.100.121;
    server 192.168.100.122;
}

server {
    listen 80;
    location / {
        proxy_pass http://backend;
    }

    location /static {
        alias /guestbook-src/02_mvp_modules_sqlite3/static;
    }
}
And power it off
$ poweroff
Now that the virtual machines are ready, it is time to start them all up. We will start them up in the background with a few commands, if we need to connect to them we have their ip addresses and ssh.
$ sudo qemu-system-x86_64 ./gb-db.qcow2 \
-m 512M -smp cpus=1 --enable-kvm \
-nic bridge,br=vmbr0,mac=52:54:00:12:34:56 \
-nographic < /dev/null > gb-db.out &

$ echo $! > gb-db.pid # Save pid file in case we need to force shutdown

$ sudo qemu-system-x86_64 ./gb-app1.qcow2 \
-m 512M -smp cpus=1 --enable-kvm \
-nic bridge,br=vmbr0,mac=52:54:00:12:34:57 \
-nographic < /dev/null > gb-app1.out &

$ echo $! > gb-app1.pid # Save pid file in case we need to force shutdown

$ sudo qemu-system-x86_64 ./gb-app2.qcow2 \
-m 512M -smp cpus=1 --enable-kvm \
-nic bridge,br=vmbr0,mac=52:54:00:12:34:58 \
-nographic < /dev/null > gb-app2.out &

$ echo $! > gb-app2.pid # Save pid file in case we need to force shutdown

$ sudo qemu-system-x86_64 ./gb-web.qcow2 \
-m 512M -smp cpus=1 --enable-kvm \
-nic bridge,br=vmbr0,mac=52:54:00:12:34:59 \
-nographic < /dev/null > gb-web.out &

$ echo $! > gb-web.pid # Save pid file in case we need to force shutdown
After 2-3 minutes the machines should be ready and accept connections.
You can see the running processes with
$ ps -ef | grep qemu-system-x86_64
Connect from your machine
Create a new ssh connection from your local machine to your host machine (SWITCHengines vm) while making a tunnel to the gb-web virtual machine.
$ ssh debian@<kvm-host-ip> -L 8080:192.168.100.123:80
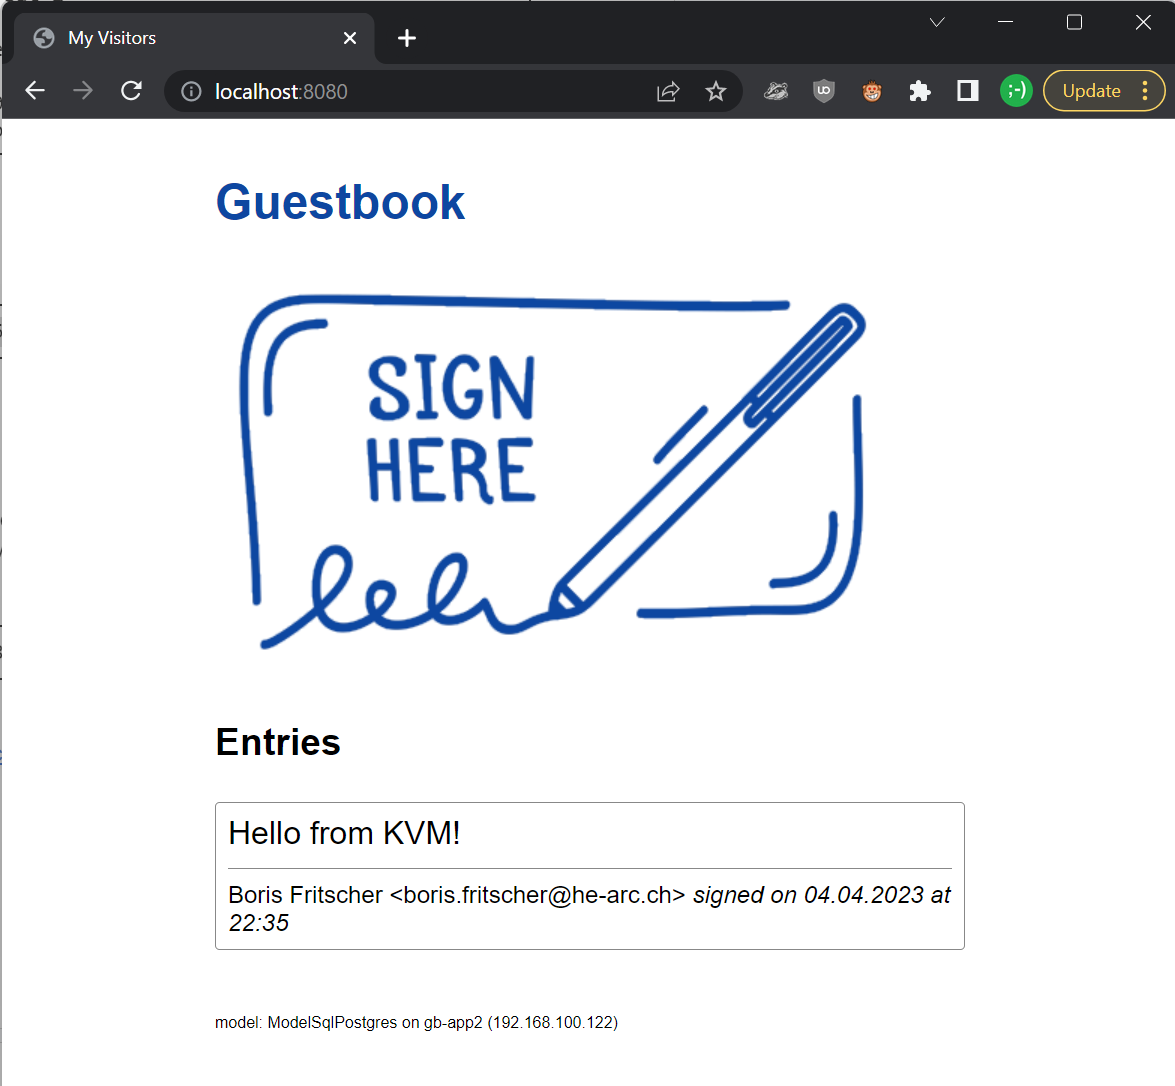
Try to connect in your browser at http://localhost:8080 to test full setup (check if by refreshing your page it switches sometimes between app1 or app2)
And voilà !
Debug
Test to connect to gunicorn directly
$ ssh debian@<kvm-host-ip> -L 8081:192.168.100.121:80
Try to connect in your browser at http://localhost:8081
From within your kvmhost connect to the local vm with ssh root@[local vm ip]
To check gunicorn connect to a gb-app vm and check gunicorn service logs with:
journalctl -u gunicorn-gb
Kill VMs
In case something very wrong happened, you can use the pid files that we generated to kill your vms with the following command :
$ sudo pkill -9 -F <gb-vm>.pid
Help I'm stuck at a vm login
Simply use this sequence of keys :
Ctrl + a x
Task Progress Check
Take a screenshot from your browser with localhost:8080, a hello KVM message and the footer showing the ip of the vm machine inside your kvm host.