
Terraform is an open-source infrastructure-as-code software tool created by HashiCorp. Users define and provide data center infrastructure using a declarative configuration language
In this lab we will use it to create new servers on a cloud provider (SWITCHEngines).
Install
Install Terraform either follow their install guide
Or on Windows you can use:
winget install Hashicorp.Terraform
To get code highlighting you can install the Official Terraform Extension.
Create a new folder for your project and a new text file named main.tf inside it.
We first must inform Terraform which Provider we want to use.
Provider
For SWITCHengines we are going to use the OpenStack Provider.
Add this section to your file.
main.tf
terraform {
  required_providers {
    openstack = {
      source  = "terraform-provider-openstack/openstack"
      version = "1.50.0"
    }
  }
}
With the provider install we need to pass in the minimal configuration.
main.tf
...
provider "openstack" {
  auth_url                      = "https://keystone.cloud.switch.ch:5000/v3"
  region                        = "LS"
  application_credential_id     = "your_id"
  application_credential_secret = "your_secret"
}
OpenStack API key
To create an api key login to your SWITCHengines account and under Identity > Application Credentials, create a new key (Leave everything blank except for the name).
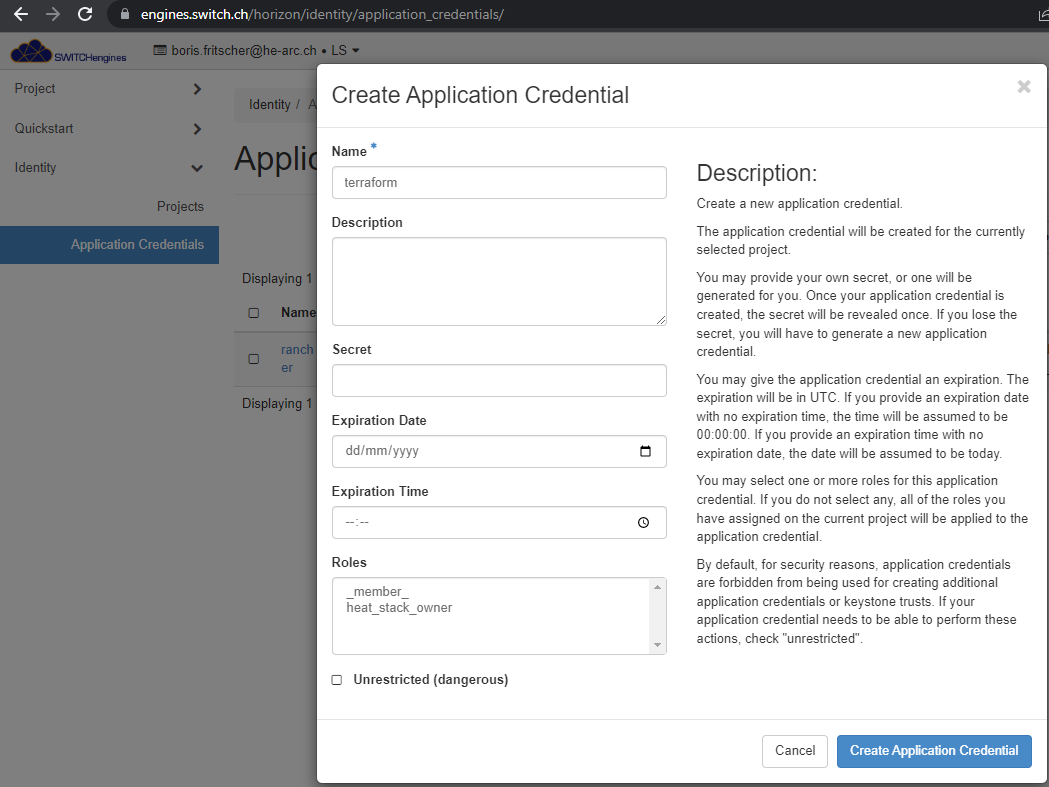
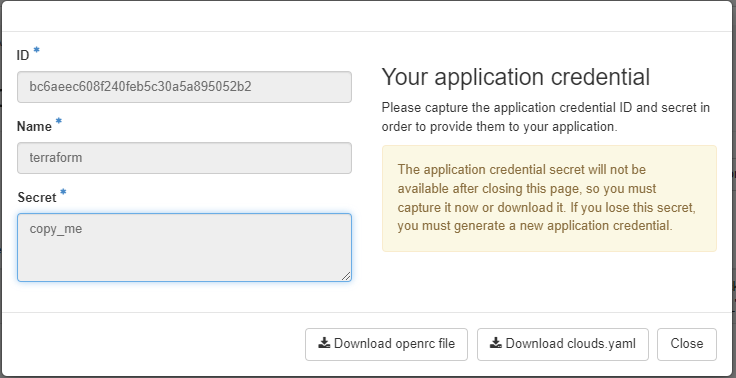
Copy the information into your main.tf file.
Define resources
We now need to define the resources we want Terraform to create. These resources need to be of a type supported/provided by our provider plugin (openstack).
For a Virtual Machine we will need: a compute instance (vm), a volume (block device), a floating ip (to access it from the outside) and finally assign the floating ip to the compute instance.
Each resource block has a type and a name.
main.tf
...
resource "openstack_compute_instance_v2" "vm_tf_web" {
  name            = "vm_tf_db"
  image_name      = "Debian Bookworm 12 (SWITCHengines)"
  flavor_name     = "m1.small"
  key_pair        = "REPLACE_WITH_YOUR_KEY_PAIR_NAME"
  security_groups = ["default", "SSH", "web"]


  block_device {
    uuid                  = "REPLACE_WITH_ID_OF_IMAGE"
    source_type           = "image"
    destination_type      = "volume"
    volume_size           = 20
    delete_on_termination = true
  }
}

resource "openstack_networking_floatingip_v2" "myip" {
  pool = "public"
}

resource "openstack_compute_floatingip_associate_v2" "myip" {
  floating_ip = openstack_networking_floatingip_v2.myip.address
  instance_id = openstack_compute_instance_v2.vm_tf_web.id
}
Image_name, flavor_name, key_pair must match names existing in our SWITCHengines account.
For block_device inside a compute instance we cannot use a named alias, and must identify the uuid of an image.
Creating resources
We can now ask terraform to create the defined resources.
The first time we need to download all the defined provider plugins:
terraform init
Then we can run our plan. Terraform will list all the changes which will happen and we can accept or cancel.
terraform apply
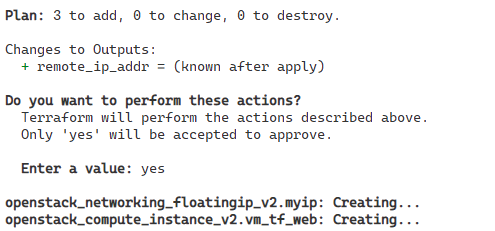
After some time our resources will be created.
State
We should not need to use the admin portal to get the floating IP. Terraform keeps state information of all resources it has created.
For a list of resources do:
terraform state list
To get details on the floatingip:
terraform state show openstack_networking_floatingip_v2.myip
You will get the public ip under address attribute
Output
In terraform we can also define outputs to more easily find the right information without looking in the state files.
Add an output which will print the floating ip.
main.tf
...
output "remote_ip_addr" {
  value = openstack_networking_floatingip_v2.myip.address
}
Run terraform again.
terraform apply
You will see that nothing is recreated and the output is displayed

Now that we have the public ip of the new remote server we could edit our ansible hosts file and start provisioning. However, if we create a lot of servers this is not practical.
Fortunately, Ansible supports generating Inventories (list of hosts) dynamically via a provider's api.
Ansible supports openstack if the python openstacksdk is installed.
Install openstacksdk
We will add this library to our previously created ansible pipx venv.
pipx inject ansible openstacksdk
Configure SDK
We now have to provide the SDK with API keys and service endpoints.
This information is stored in the clouds.yaml file we downloaded before!
Copy clouds.yaml to the right location (create the folders if missing)
~/.config/openstack/clouds.yaml
Enable plugin
Inside your ansible project inventory folder create a new file openstack.yaml.
We set up some configuration of the plugin to work with our limited SWITCHengines setup. Additionally we provide the user ansible should use to login into our machines (pay attention to the quotes!).
inventory/openstack.yaml
plugin: openstack.cloud.openstack
expand_hostvars: false
fail_on_errors: true
all_projects: false
compose:
  ansible_user: "'debian'"
Test Inventory
List all hosts in the current inventory (static and dynamic)
ansible -i inventory all --list-hosts
Get host ip's for all server starting with name vm_tf_db
ansible -i inventory/openstack.yaml "vm_tf_db*" -m debug -a "var=ansible_host"
Ansible postgresql example
Could do via sh script like before but since ansible has a postgresql plugin use it for better idempotency
Here is a playbook you can try out.
postgresql.yaml
- name: Setup DB server
  hosts: vm_tf_db
  become: true
  tasks:
    - name: Ensure postgresql is installed
      ansible.builtin.apt:
        name:
          - postgresql
          - python3-psycopg2
          - acl
        state: present
        update_cache: true

    - name: Postgres config
      become_user: postgres
      block:
        - name: Should listen on all ports
          community.postgresql.postgresql_set:
            name: listen_addresses
            value: '*'


        - name: Set TimeZone parameter (careful, case sensitive)
          community.postgresql.postgresql_set:
            name: TimeZone
            value: 'Europe/Zurich'

        - name: Open connection to remote
          community.postgresql.postgresql_pg_hba:
            dest: /etc/postgresql/13/main/pg_hba.conf
            rules:
              - contype: host
                databases: all
                users: all
                method: md5
                source: ::0/0
              - contype: host
                databases: all
                users: all
                method: md5
                source: 0.0.0.0/0

        - name: Create a new database with name "guestbook"
          community.postgresql.postgresql_db:
            name: guestbook

        - name: Create guestbook user, set password
          community.postgresql.postgresql_user:
            name: guestbook
            password: guestbook

        - name: GRANT ALL PRIVILEGES to guestbook on guestbook
          community.postgresql.postgresql_privs:
            db: guestbook
            role: guestbook
            obj: ALL_IN_SCHEMA
            privs: ALL


    - name: Restart postgresql
      ansible.builtin.service:
        name: postgresql
state: restartedIt can happen that terraform's state does not correspond with reality. For example, if SWITCHengines stopped your server during the night.
You can tell terraform to update its state with:
terraform refresh
Running
terraform apply
Will put your server back into running mode.
You can easily clean up everything by telling terraform to remove all created resources.
terraform destroy
Let's dive deeper into features of terraform to help us setup four servers: 1 web, 2 apps and 1 db.
Variables
First we want to remove our hardcoded API secrets and replace them with variables.
Create a variable.tf file and define sensitive variables for the api key.
variables.tf
variable "switchengine_application_credential_id" {
  type        = string
  sensitive   = true
}

variable "switchengine_application_credential_secret" {
  type        = string
  sensitive   = true
}

variable "duckdns_token" {
  type = string
  sensitive = true
}

variable "duckdns_domain" {
  type = string
  default = "gb-heg"
}
In the main file you can access variables with the var keyword.
main.tf
provider "openstack" {
  auth_url                      = "https://keystone.cloud.switch.ch:5000/v3"
  region                        = "LS"
  application_credential_id     = var.switchengine_application_credential_id
  application_credential_secret = var.switchengine_application_credential_secret
}
When running a terraform command you will be asked to provide the values for all variables without defaults.
But you can use a special terraform.tfvars file to provide initial value of these variable (be sure to NOT COMMIT this file)
terraform.tfvars
switchengine_application_credential_id="REPLACE_HERE"
switchengine_application_credential_secret="REPLACE_HERE"
Attention quotes are required
Local variables
Inside a tf script you can also use local variables defined in a locals block, these variables will be available under a special local keyword.
Provisioner
It is possible to run small scripts or command lines directly form terraform either on the remote host or on the local machine. This is done in a provisioner section inside a resource block. This cone will execute on resource creation only.
Advanced Example
Below is a complete terraform plan which will configure the servers.
The num_app_srv variable is used to define the number of app servers to create. It is used in combination with the count attribute which helps in duplicating the same resource multiple times (here the app server).
The db server is the only one with a persistent volume.
A local variable is used to store a concatenated lookup of all generated servers. This is used to map the required floating IPs.
In the floating IP association we also use a provisioner script to update duckdns.org with the IP of the web server instance.
main.tf
variable "num_app_srv" {
  type = number
}

terraform {
  required_providers {
    openstack = {
      source  = "terraform-provider-openstack/openstack"
      version = "1.50.0"
    }
  }
}

provider "openstack" {
  auth_url                      = "https://keystone.cloud.switch.ch:5000/v3"
  region                        = "LS"
  application_credential_id     = var.switchengine_application_credential_id
  application_credential_secret = var.switchengine_application_credential_secret
}

resource "openstack_networking_floatingip_v2" "floatingips" {
  count = var.num_app_srv + 2
  pool  = "public"
}

resource "openstack_compute_instance_v2" "vm_tf_web" {
  name            = "vm_tf_web"
  image_name      = "Debian Bullseye 11 (SWITCHengines)"
  flavor_name     = "m1.small"
  key_pair        = "REPLACE_WITH_OUR_KEY"
  security_groups = ["default", "SSH", "web"]
}


resource "openstack_compute_instance_v2" "vm_tf_app" {
  count = var.num_app_srv

  name            = "vm_tf_app${count.index + 1}"
  image_name      = "Debian Bullseye 11 (SWITCHengines)"
  flavor_name     = "m1.small"
  key_pair        = "boris"
  security_groups = ["default", "SSH"]
}

resource "openstack_compute_instance_v2" "vm_tf_db" {
  name            = "vm_tf_db"
  image_name      = "Debian Bullseye 11 (SWITCHengines)"
  flavor_name     = "m1.small"
  key_pair        = "boris"
  security_groups = ["default", "SSH"]


  block_device {
    uuid                  = "06c5a538-8123-49d3-83f4-0a8fc5a07967"
    source_type           = "image"
    destination_type      = "volume"
    volume_size           = 20
    delete_on_termination = true
  }
}

locals {
  instance_map = { for i in concat(openstack_compute_instance_v2.vm_tf_app, [openstack_compute_instance_v2.vm_tf_db, openstack_compute_instance_v2.vm_tf_web]) : i.id => i.name}
}

resource "openstack_compute_floatingip_associate_v2" "assigned_ips" {
  count       = var.num_app_srv + 2
  floating_ip = openstack_networking_floatingip_v2.floatingips[count.index].address
  // splat not supported https://github.com/hashicorp/terraform/issues/19931
  instance_id = keys(local.instance_map)[count.index]

  provisioner "local-exec" {
    command = (
      local.instance_map[self.instance_id] == "vm_tf_web" ?
      "curl -k %DUCKDNS_URL%" : "exit 0"
    )
    environment = {
      DUCKDNS_URL = "\"https://www.duckdns.org/update?domains=${var.duckdns_domain}&token=${var.duckdns_token}&ip=${self.floating_ip}\""
    }
  }
}

output "remote_ip_addr" {
  value = { for a in openstack_compute_floatingip_associate_v2.assigned_ips : local.instance_map[a.instance_id] => a.floating_ip }
}
Task Progress Check
Take a screenshot from your SWITCHengines vm instances dashboard showing the created virtual machines.