
Docker has become a popular tool in DevOps for the containerisation and deployment of applications. It provides a standardised way to package applications along with their dependencies and runtime environment into a container, which can be easily distributed and run on different environments.
Docker Desktop
To use docker on windows the easiest way is to install Docker Desktop, which will help you configure hyper-v and wsl2 to run docker inside it.
https://www.docker.com/products/docker-desktop/
Docker on Linux Servers
On the server you must install docker from the command line following the official guide and choosing the right distribution.
https://docs.docker.com/engine/install/
This lab is adapted from "The Docker Workshop", published by Packt
1. Enter the docker run command in a Bash terminal or PowerShell window.
This instructs Docker to run a container called hello-world:
$ docker run hello-world
2. Use the docker ps command to see what containers are running on your system.
Type the following command:
$ docker ps
The output of the docker ps command is empty because it only shows currently running containers by default. This is similar to the Linux/Unix ps command, which only shows the running processes.
3. Use the docker ps -a command to display all the containers, even the stopped ones:
$ docker ps -a
In the output returned, you should see the hello-world container instance:

As you can see, Docker gave the container a unique container ID. It also displays
the IMAGE that was run, the COMMAND within that image that was executed, the TIME it was created, and the STATUS of the process running that container, as well as a unique human-readable name. This particular container was created approximately 4 seconds ago, executed the program /hello, and ran successfully. You can tell that the program ran and executed successfully since it resulted in an Exited (0) code.
4. Use the docker pull command to download the Ubuntu 18.04 and Ubuntu 19.04 images.
$ docker pull ubuntu:18.04
$ docker pull ubuntu:19.04
5. Use the docker images command to confirm that the container images are downloaded to the local container cache:
$ docker images
The contents of the local container cache will display the Ubuntu 18.04 and Ubuntu 19.04 base images, as well as our hello-world image from the earlier exercise:

6. Run the docker run command with flags,
Run the docker run command passing in the -i flag to make the session interactive (expecting user input), and the -t flag to allocate a pseudo-tty handler to the container. pseudo-tty handler will essentially link the user's terminal to the interactive Bash shell running inside the container. This will allow Bash to run properly since it will instruct the container to run in an interactive mode, expecting user input. You can also give the container a human-readable name by passing in the --name flag.
Type the following command in your Bash terminal:
$ docker run -i -t -d --name ubuntu1 ubuntu:18.04
7. Execute the docker ps -a command again to check the status of the container instance:
$ docker ps -a
8. You now have an Ubuntu container up and running.
You can run commands inside this container using the docker exec command. Run the exec command to access a Bash shell, which will allow us to run commands inside the container. Similar to docker run, pass in the -i and -t flags to make it an interactive session. Also pass in the name or ID of the container, so that Docker knows which container you are targeting. The final argument of docker exec is always the command you wish to execute. In this case, it will be /bin/bash to start a Bash shell inside the container instance:
$ docker exec -it ubuntu1 /bin/bash
You should immediately see your prompt change to a root shell. This indicates that you have successfully launched a shell inside your Ubuntu container. The hostname of the container, cfaa37795a7b, is taken from the first twelve characters of the container ID. This allows the user to know for certain which container are they accessing, as seen in the following example:
root@cfaa37795a7b:/#
9. From inside the container, you are very limited in terms of what tools you have available. Unlike a VM image, container images are extremely minimal in terms of the packages that come preinstalled. The echo command should be available, however.
Use echo to write a simple message to a text file:
root@cfaa37795a7b:/# echo "Hello world from ubuntu1" > hello-world.txt
10. Run the exit command to exit from the Bash shell of the ubuntu1 container.
You should return to your normal terminal shell.
11. Instead of using docker exec to access a shell inside our containers, use it to display the output of the hello-world.txt files you wrote by executing the cat command inside the containers:
$ docker exec -it ubuntu1 cat hello-world.txt
The output will display the hello-world message you passed into the container in the previous steps. Notice that as soon as the cat command was completed and the output displayed, the user was moved back to the context of your main terminal. This is because the docker exec session will only exist for as long as the command the user is executing will run. In the earlier example of the Bash shell, Bash will only exit if the user terminates it by using the exit command. In this example, only the Hello world output is displayed because the cat command displayed the output and exited, ending the docker exec session:
Hello world from ubuntu1
12. In a similar manner to that you used to execute commands inside our running containers, you can also stop, start, and restart them.
Stop your container instances using the docker stop command. In your terminal session, execute the docker stop command, followed by the name or container ID of the ubuntu1 container:
$ docker stop ubuntu1
12. Execute the docker ps -a command to view all container instances, regardless of whether they are running, to see your container in a stopped state.
13. Use the docker start or docker restart command to start the container instance:
$ docker start ubuntu1
14. Verify that the container is running again by using the docker ps command.
15. The final stage of the container management life cycle is cleaning up the container instances you created.
Use the docker stop command to stop the ubuntu1 container instance:
$ docker stop ubuntu1
16. When container instances are in a stopped state, use the docker rm command to delete the container instances altogether.
Use docker rm followed by the name or container ID to delete the ubuntu1 container instance:
$ docker rm ubuntu1
17. To completely reset the state of our Docker environment, delete the base images you downloaded during this exercise as well. Use the docker images command to view the cached base images:
$ docker images
The list of Docker images and all associated metadata in your local cache will display:

18. Execute the docker rmi command followed by the image ID to delete the image:
$ docker rmi c88ac1f841b7
Similar to docker pull, the rmi command will delete each image and all associated layers.
Perform this step for each image you wish to delete, substituting in the various image IDs. For each base image you delete, you will see all of the image layers get untagged and deleted along with it.
Docker supports native DNS lookup between containers on the same network. We will test this by creating a network and attaching two containers to it.
1. Use the docker network create command to create a new Docker network
using a 192.168.54.0/24 subnet and using the IP address 192.168.54.1 as the default gateway:
$ docker network create dnsnet --subnet 192.168.54.0/24 --gateway 192.168.54.1
The successful execution of this command will return the ID of the network you have created.
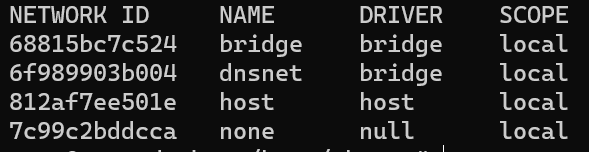
2. Use the docker network ls command to list the Docker networks available in this environment:
$ docker network ls
The list of Docker networks should be returned, including the dnsnet network you just created:
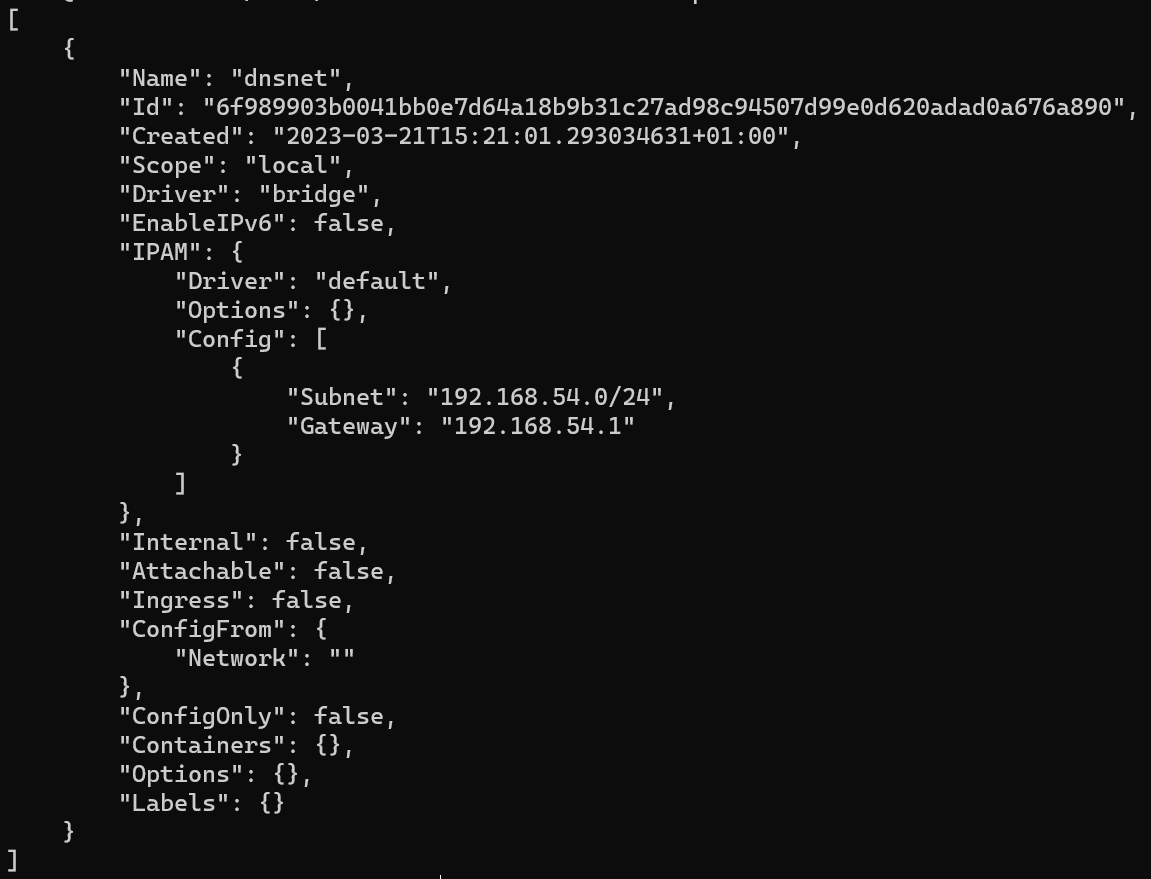
3. Run the docker network inspect command to view the configuration for this network:
$ docker network inspect dnsnet
The details of the dnsnet network should be displayed. Pay close attention to the Subnet and Gateway parameters. These are the same parameters that you used to create a Docker network.
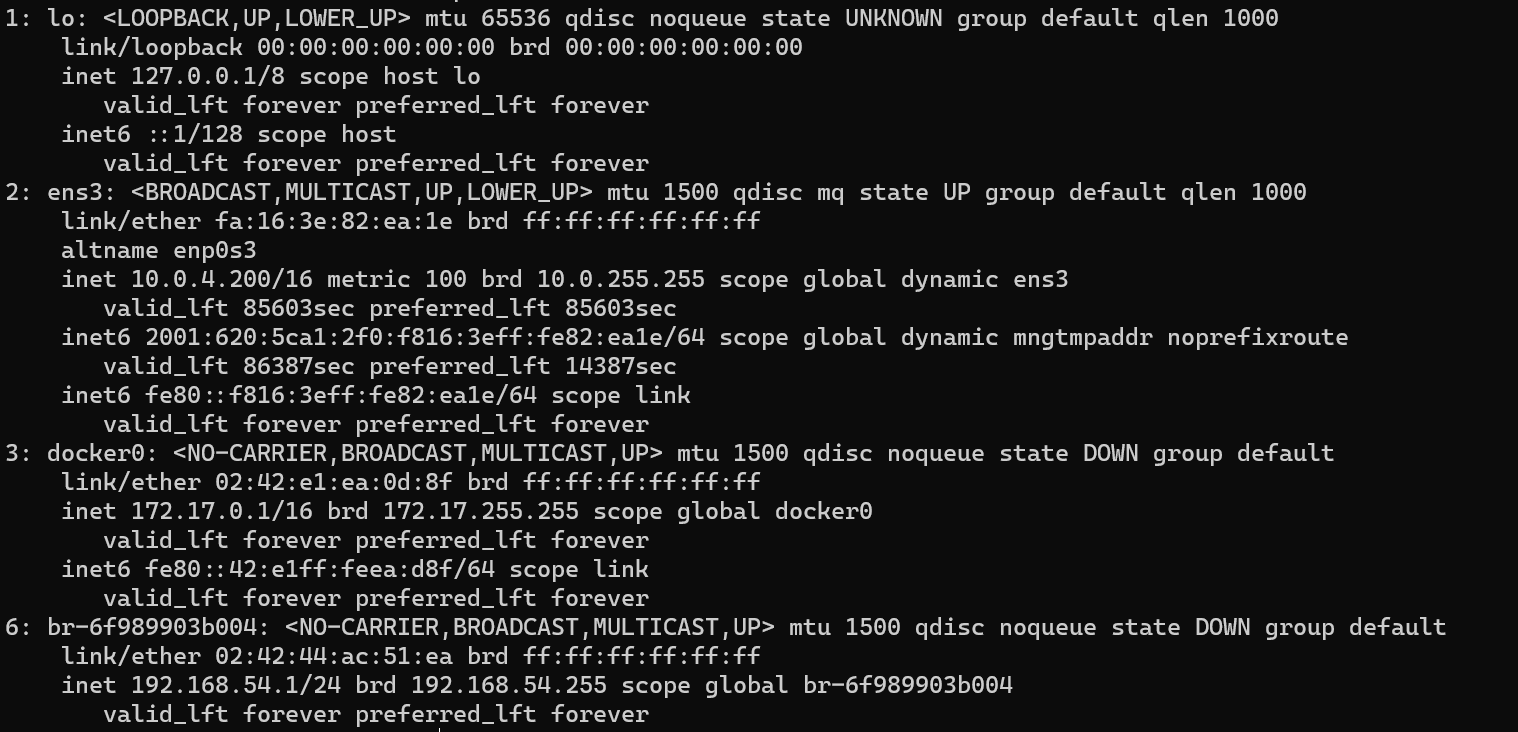
4. Since this is a Docker bridge network, Docker will also create a corresponding bridge network interface for this network. The IP address of the bridge network interface will be the same IP address as the default gateway address you specified when creating this network. Use the ip command to view the configured network interfaces on Linux or macOS.
$ ip a
This should display the output of all available network interfaces, including the newly created bridge interface:
5. Now that a new Docker network has been created, use the docker run command to start a new container (alpinedns1) within this network.
Use the docker run command with the --network flag to specify the dnsnet network that was just created, and the --network-alias flag to give your container a custom DNS name:
$ docker run -itd --network dnsnet --network-alias alpinedns1 --name alpinedns1 alpine:latest
Upon successful execution of the command, the full container ID should be displayed before returning to a normal terminal prompt.
6. Start a second container (alpinedns2) using the same --network and --network-alias settings:
$ docker run -itd --network dnsnet --network-alias alpinedns2 --name alpinedns2 alpine:latest
7. Use the docker ps command to verify that the containers are running as expected:
$ docker ps
The output will display the running container instances:

8. Use the docker inspect command to verify that the IP addresses of the container instances are from within the subnet (192.168.54.0/24) that was specified:
$ docker inspect alpinedns1
The following output is truncated to show the relevant details:
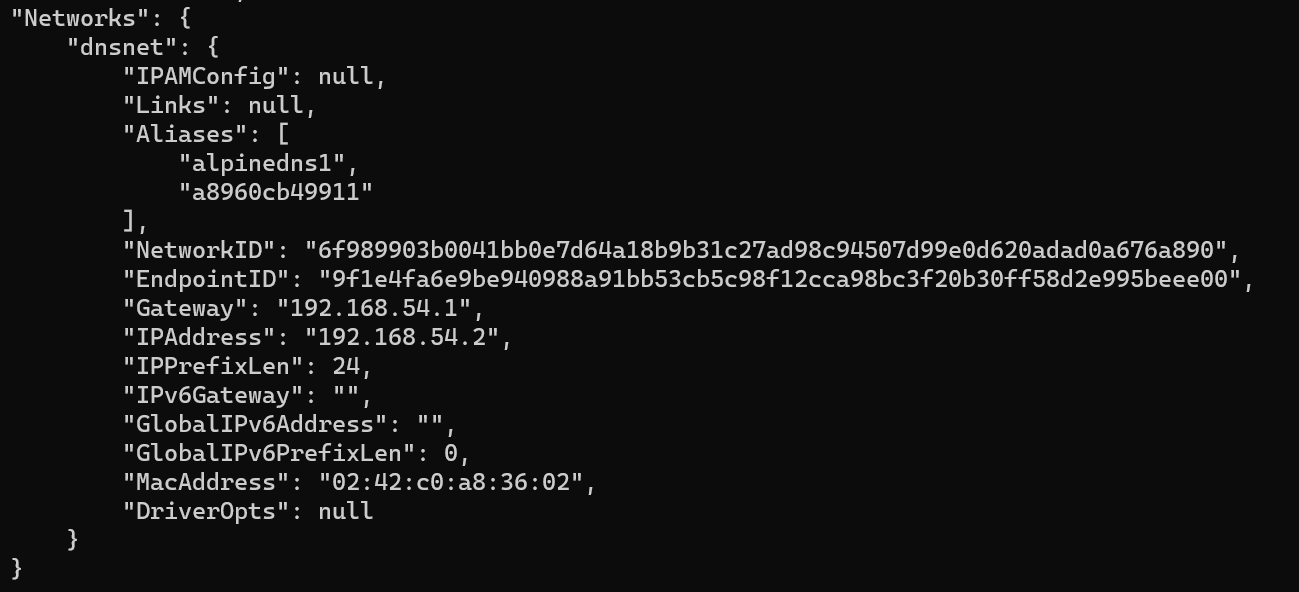
It can be observed from the output that the alpinedns1 container was
deployed with an IP address of 192.168.54.2, which is a part of the subnet that was defined during the creation of the Docker network.
9. Execute the docker network inspect command in a similar fashion for the alpinedns2 container:
$ docker inspect alpinedns2
It can be observed in the preceding output that the alpinedns2 container has an IP address of 192.168.54.3, which is a different IP address within the dnsnet subnet.
10. Run the docker exec command to access a shell in the alpinedns1 container:
$ docker exec -it alpinedns1 /bin/sh
This should drop you into a root shell inside of the containers.
11. Once inside the alpinedns1 container, use the ping utility to ping the alpinedns2 container:
$ ping alpinedns2
The ping output should display successful network connectivity to the alpinedns2 container instance:

CTRL + C to exit ping
12. Use the exit command to return to your primary terminal. Use the docker exec command to gain access to a shell inside the alpinedns2 container:
$ docker exec -it alpinedns2 /bin/sh
This should drop you to a shell within the alpinedns2 container.
13. Use the ping utility to ping the alpinedns1 container by name:
$ ping alpinedns1
14.. Clean up your environment by stopping all running containers using the docker stop command:
$ docker stop alpinedns1
$ docker stop alpinedns2
15. Use the docker system prune -fa command to clean the remaining stopped containers and networks:
$ docker system prune -fa
Successfully executing this command should clean up the dnsnet network as well as the container instances and images:
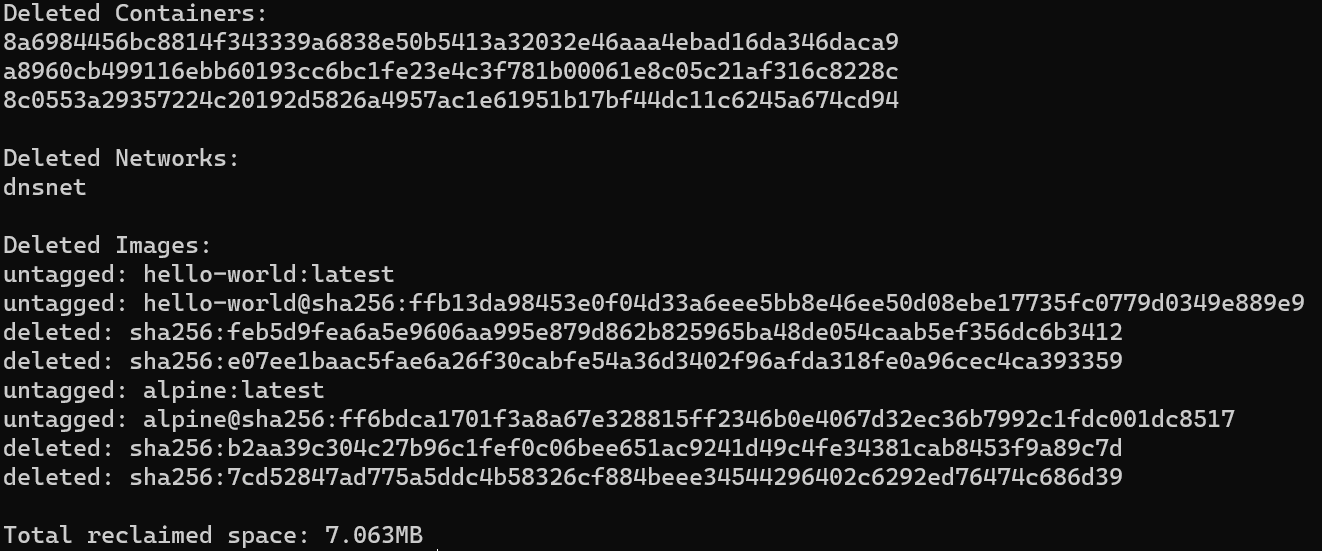
Each section of the system prune output will identify and remove Docker resources that are no longer in use. In this case, it will remove the dnsnet network since no container instances are currently deployed in this network.
Task Progress Check
Take a screenshot from the output of the prune command as shown above and paste it below.
Create a index.html file
index.html
<html>
  <body>
    <h1>Hello Docker</h1>
  </body>
</html>
Run a container from the latest nginx version to serve your file via a web server.
You need to map the ports and folder to let nginx container see your file and that you can access the web server.
$ docker run -d -p 80:80 --name webserver -v /path/to/folder/where/your/fileis:/usr/share/nginx/html nginx
Test that your website is visible in a browser
Open a bash session inside your container and look what is inside the /usr/share/nginx/html folder
$ docker exec -ti webserver bash
Stop and remove your container
$ docker stop webserver
$ docker rm webserver