We've seen Docker, and it's great :
- It allows us to run applications in isolated lightweight environments
- It offers network management for those environments
- It allows for reproducible builds
But, when it comes to deploying, when you add some options it can start to be a bit of a hassle.
Here is an example for a Secure Web Access Gateway deployment using docker cli (Do not execute it) :
$ docker run -d --name=swag --cap-add=NET_ADMIN -e PUID=1000 -e PGID=1000 -e \
TZ=Etc/UTC -e URL=yourdomain.url -e VALIDATION=http -e SUBDOMAINS=www \
-e CERTPROVIDER=ACME -e DNSPLUGIN=cloudflare -e PROPAGATION=True \
-e EMAIL=test@test.ts -e ONLY_SUBDOMAINS=false -e EXTRA_DOMAINS=exemple.org \
-e STAGING=false \
-p 443:443 -p 80:80 -v /path/to/appdata/config:/config \
--restart unless-stopped lscr.io/linuxserver/swag:latest
Do not learn this!
Now imagine that you are asked to deploy a second one, a database, a load balancer in front of it and a redis cache.
And then you have to do it a second time perfectly with no mistake, but you have to change the PROPAGATION environment variable to False instead.
And imagine you are asked to do this 100 times and a single mistake would doom the project.
Sounds like a nightmare right ?
Lets introduce docker compose. Docker compose is a tool that starts an entire deployment specified in a docker compose file (docker-compose.yaml by default) It handles every ressources that docker usually handles and every option can be defined in this file. This way you don't have to learn the exact commands and you avoid making mistakes. Think of a compose file as if it was a blueprint, docker compose reads the blueprint and deploys it.
In this lab, we will discover docker compose and how to write a complete docker-compose file. We'll use this technology to once again deploy our guestbook application.
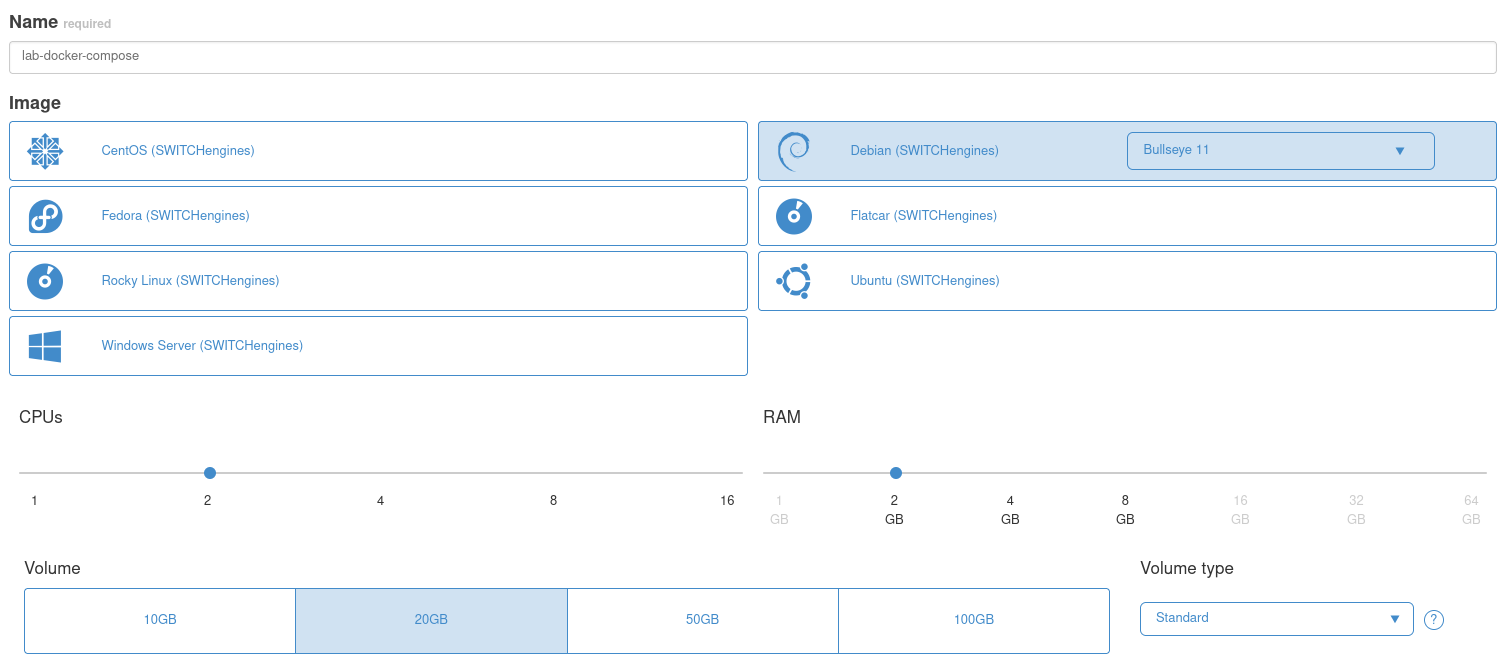
The first step is to set up a virtual machine in switch engine, this will be the host of our containers.
Create an instance
with debian Bullseye 11, 2CPUs, 4 GB of ram and a 20 GB volume.
Install docker and docker compose
SSH into it.
$ ssh debian@xxx.xxx.xxx.xxx
When you have your session opened, use the following commands to update the repository and install docker + docker compose
$ sudo apt update
$ sudo apt install -y ca-certificates curl gnupg nano git
$ sudo install -m 0755 -d /etc/apt/keyrings
$ curl -fsSL https://download.docker.com/linux/debian/gpg | sudo gpg --dearmor -o /etc/apt/keyrings/docker.gpg
$ sudo chmod a+r /etc/apt/keyrings/docker.gpg
$ echo "deb [arch="$(dpkg --print-architecture)" signed-by=/etc/apt/keyrings/docker.gpg] https://download.docker.com/linux/debian \
  "$(. /etc/os-release && echo "$VERSION_CODENAME")" stable" | \
  sudo tee /etc/apt/sources.list.d/docker.list > /dev/null
$ sudo apt update
$ sudo apt install -y docker-ce docker-ce-cli containerd.io docker-buildx-plugin docker-compose-plugin
$ sudo usermod -aG docker debian # Add yourself to the docker group
$ exit # Exits the session so that you can have the updated group on next login
Login with port forwarding
$ ssh debian@xxx.xxx.xxx.xxx -L 5000:localhost:5000 -L 8080:localhost:80 # Relogin and set up port forwarding
Now you should have the session with docker, docker compose and also your user in the docker group.
Docker compose is a submodule of docker and can be used like this :
$ docker compose
If you haven't done so already, we need to fetch the usual guestbook-src and change directory into the docker folder.
$ git clone https://github.com/bfritscher/guestbook-src
$ cd guestbook-src/04_container_docker
We're going to start with a simple deployment, take a look at docker-compose.simple.yml
$ nano docker-compose.simple.yml
Here is a version with annotation
Pay attention to the comments on each line explaining what their purpose is
docker-compose.simple.yml
version: "3.9" # Indicates to docker compose the version of the file
volumes: # This part will create volumes
  db_data: # We define a single volume, this is the equivalent of
           # "docker volume create db_data"
services: # This part will create containers like "docker run" would
  app: # The first container is called app
    build: # Build indicates build options, like "docker build" would
      context: .
      dockerfile: Dockerfile.alpine
    environment: # This part lists environment variables we would like
      - DB_HOST=db # Equivalent of "-e DB_HOST=db"
      - DB_USER=guestbook
      - DB_NAME=guestbook
      - DB_PASS=guestbook
      - DB_PORT=5432
      - GUESTBOOK_SERVICE=postgres
    depends_on: # This is specific to docker compose, the container depends
                # on other containers before running
      - db # In this case, app will wait before db started
    ports: # Specify the ports that we want to be accessed from outside
      - "5000:5000"
  db: # The second container will be db
    image: postgres:15 # This time we don't docker build, we use an image
    environment:
      - POSTGRES_USER=guestbook
      - POSTGRES_PASSWORD=guestbook
      - POSTGRES_DB=guestbook
    volumes: # db uses the volume created beforehand
      - db_data:/var/lib/postgresql/data # equivalent to "-v db_data:/var..."
Docker equivalent
Here are the equivalent docker commands if used directly (do not use!):
$ docker create network simple_app
$ docker build . -f Dockerfile.alpine -t app:simple
$ docker volume create db_data
$ docker run -d --name db --network simple_app -v db_data:/var/lib/postgresql/data \
-e POSTGRES_USER=guestbook -e POSTGRES_PASSWORD=guestbook \
-e POSTGRES_DB=guestbook postgres:15
$ docker run -d --name app --network simple_app \
-e DB_HOST=db -e DB_USER=guestbook -e DB_NAME=guestbook \
-e DB_PASS=guestbook -e DB_PORT=5432 -e GUESTBOOK_SERVICE=postgres \
-p 5000:5000 app:simple
And if you want to stop it you need to remember to destroy the network. Also the commands order is important since you do not have any dependency managed like docker compose does with the "depends" section.
Deploying docker-compose file
Anyway, the magic is here, you can simply deploy your application with the following command instead of whatever is written above :
$ docker compose -f docker-compose.simple.yml up -d # Starts the deployment
And then check that everything is running with:
$ docker compose -f docker-compose.simple.yml ps # Gets container status
Let's break this down :
- -f specify which docker compose file we want to use. Up Tells that we want to create the deployment.
- -d means that we want it in detached mode, in the background.
You should now be able to access your app by going to http://localhost:5000 and be welcomed by the usual "Sign Here".
This is because docker cannot know by itself that your specific piece of software needs some time to be ready. You can try to make it work by writing the up command again
$ docker compose -f docker-compose.simple.yml logs # Check error messages
$ docker compose -f docker-compose.simple.yml up -d # Starts the deployment
$ docker compose -f docker-compose.simple.yml ps # Gets container status
And this time it should be working.
Thanks to the wonders of docker compose, you can easily shut down the deployment the following way and docker compose will clean everything up:
$ docker compose -f docker-compose.simple.yml down
This deployment was simple and is a pretty nice example of what docker compose can do.
If you're unlucky in the previous section, the database was not ready and you had to correct it by restarting "app". We can put a better dependency in the compose file. You may be tempted to add a simple delay to "app" but this is not supported because it's not a good portable and reproducible solution. Instead we can tell docker what constitutes "ready" for our container. This way docker will not start the dependents before our condition is satisfied. The condition being "database is ready".
Take a look at the file called docker-compose.dependency.yml
docker-compose.dependency.yml
version: "3.9"
volumes:
  db_data:
services:
  app:
    build:
      context: .
      dockerfile: Dockerfile.alpine
    environment:
      - DB_HOST=db
      - DB_USER=guestbook
      - DB_NAME=guestbook
      - DB_PASS=guestbook
      - DB_PORT=5432
      - GUESTBOOK_SERVICE=postgres
    depends_on:
      db:
        condition: service_healthy # Instead of just waiting on the
                                   # container to be ready, we specified
                                   # that the container should be "healthy"
    ports:
      - "5000:5000"
    restart: always
  db:
    image: postgres:15
    environment:
      - POSTGRES_USER=guestbook
      - POSTGRES_PASSWORD=guestbook
      - POSTGRES_DB=guestbook
    volumes:
      - db_data:/var/lib/postgresql/data
    restart: always
    # A health check determines if our container is "healthy" we can then
    # specify what constitutes as healthy for our container
    # In our case, healthy means that the command "pg_isready -U guestbook"
    # Returns true, which means that the database is ready
    healthcheck:
      test: ["CMD", "pg_isready", "-U", "guestbook"]
      interval: 10s # We can also add some more options to fine tune our
                    # Health check
      timeout: 5s
      retries: 5
This time on the app we're waiting for the db to be healthy and we specify that a healthy db is when pg_isready -U guestbook returns true. We instruct the system to run that command every 10s and to retry 5 times if it returns false.
You can start this deployment.
$ docker compose -f docker-compose.dependency.yml up -d # Starts the deployment
$ docker compose -f docker-compose.dependency.yml ps # Gets container status
Once again going to http://localhost:5000 Will show the application, but this time it will work without restarting (even if you're unlucky)
And now destroy it :
$ docker compose -f docker-compose.dependency.yml down
This is nice and all, but we did a load balanced complex deployment on virtual machines before, so why not try again but with a docker compose this time.
Previously, we did a 4 machines deployment to have a load balancer, two replicas of our app and the database.
Take a look at docker-compose.nginx.yml
This time it's a bit more complicated, but I'll walk you through the important changes compared to the previous one.
docker-compose.nginx.yml
version: "3.9"
volumes:
  db_data:
networks: # This time we declare two networks instead of the implicit one
  frontend:
  backend:
services:
  web: # We declare a load balancer nginx
        restart: always
        build: ./nginx
        environment:
          NGINX_HOST: guestbook
        depends_on:
          - app # Nginx will only run after the apps are up
            # We do not need a health check, we just need the containers up
        ports:
          - "80:80" # Nginx will be available on http and https
          - "443:443"
        networks:
          - frontend # We want nginx to be on the two networks
          - backend
  app:
        build:
          context: .
          dockerfile: Dockerfile.alpine
        environment:
          - DB_HOST=db
          - DB_USER=guestbook
          - DB_NAME=guestbook
          - DB_PASS=guestbook
          - DB_PORT=5432
          - GUESTBOOK_SERVICE=postgres
        depends_on:
          db:
            condition: service_healthy
        deploy: # This is new, deploy allows us to specify deployment options
          replicas: 2 # We specify that we want two app containers instead of
                  # one
        networks:
          - backend
        restart: always
  db:
        image: postgres:15
        environment:
          - POSTGRES_USER=guestbook
          - POSTGRES_PASSWORD=guestbook
          - POSTGRES_DB=guestbook
        volumes:
          - db_data:/var/lib/postgresql/data
        restart: always
        healthcheck:
          test: ["CMD", "pg_isready", "-U", "guestbook"]
          interval: 10s
          timeout: 5s
          retries: 5
        networks:
          - backend
In this compose file, we have three services, A nginx that will act as a load balancer, an app that will have two replicas (two containers) and a database. We also specified a more advanced network topology with every service sharing the "backend" network and nginx also being on the "frontend" network. Such options allow for better security or more advanced deployments.
Anyway, let's run this deployment:
$ docker compose -f docker-compose.nginx.yml up -d # Starts the deployment
$ docker compose -f docker-compose.nginx.yml ps # Gets container status
You should access the deployment http://localhost:8080 (We set up a port forward from 8080 to 80 on the machine). We should see the guestbook.
Nginx upstream
By refreshing the page you will see that nginx switches the backend app between the two containers. We did not need to add every ip of the containers to nginx configuration as docker compose maintains its own dns round robin for the instances of the same service.
You should see something like model: ModelSqlPostgres on 09d499c03f67 (172.22.0.4) or model: ModelSqlPostgres on 408dbee26293 (172.22.0.5)
nginx.conf
server {
   listen 80;
   location / {
      proxy_pass http://backend;
   }
}
upstream backend {
   server app:5000;
}
By now you can easily see how easy docker compose makes deploying applications.
This deployment actually includes another container to set up SSL certificates.
Setup Security Groups
For this part you will need to remember or go through C04b Production Ready Guestbook on a VM with SSL to set up the following things on your current VM :
- Security groups to allow http and https connections
- DNS that points to the public ip of your current virtual machine
Test http access
When this is done, if you haven't turned off the previous deployment, try to access your domain name in http. You should see the guestbook, this will confirm that your vm can accept http and https connections. Browse to http://xxx.xxx.xxx.xxx
Now turn it off.
$ docker compose -f docker-compose.nginx.yml down
Add SSL container
And let's go to the final and next one. Docker-compose.nginx-proxy.yml.
In this version we replaced our custom nginx with a special nginx-proxy which is configured via docker compose labels instead of building our own configuration files. You can also see an additional container called letsencrypt-companion which will work with nginx-proxy to configure ssl for our service. This is also configured via labels and environment variables.
Adapt the marked section in your file. VIRTUAL_HOST, LETSENCRYPT_HOST, LETSENCRYPT_EMAIL
docker-compose.nginx-proxy.yml
version: "3.9"
volumes:
  db_data:
  certs:
  vhost.d:
  acme:
  html:
networks:
  frontend:
  backend:
services:
  web:
        image: nginxproxy/nginx-proxy
        restart: always
        labels:
          com.github.jrcs.letsencrypt_nginx_proxy_companion.nginx_proxy: "true"
        volumes:
          - certs:/etc/nginx/certs:ro
          - vhost.d:/etc/nginx/vhost.d
          - html:/usr/share/nginx/html
          - /var/run/docker.sock:/tmp/docker.sock:ro
        ports:
          - "80:80"
          - "443:443"
        networks:
          - frontend
          - backend
  letsencrypt-companion:
        image: nginxproxy/acme-companion
        restart: always
        volumes:
          - certs:/etc/nginx/certs
          - acme:/etc/acme.sh
          - vhost.d:/etc/nginx/vhost.d
          - html:/usr/share/nginx/html
          - /var/run/docker.sock:/var/run/docker.sock:ro
        networks:
          - frontend
        depends_on:
          - web
  app:
        build:
          context: .
          dockerfile: Dockerfile.alpine
        environment:
          - DB_HOST=db
          - DB_USER=guestbook
          - DB_NAME=guestbook
          - DB_PASS=guestbook
          - DB_PORT=5432
          - GUESTBOOK_SERVICE=postgres
          - VIRTUAL_HOST=         # Write your domain name
          - VIRTUAL_PORT=5000
          - LETSENCRYPT_HOST=     # Write the same domain name
          - LETSENCRYPT_EMAIL=    # state your email
        depends_on:
          db:
            condition: service_healthy
        deploy:
          replicas: 2
        networks:
          - backend
        restart: always
  db:
        image: postgres:15
        environment:
          - POSTGRES_USER=guestbook
          - POSTGRES_PASSWORD=guestbook
          - POSTGRES_DB=guestbook
        volumes:
          - db_data:/var/lib/postgresql/data
        restart: always
        healthcheck:
          test: ["CMD", "pg_isready", "-U", "guestbook"]
          interval: 10s
          timeout: 5s
          retries: 5
        networks:
          - backend
If your vm is opened to http and https port, your domain name points to the VM, it is time to start this deployment :
$ docker compose -f docker-compose.nginx-proxy.yml up -d
Wait a bit for the certificate to get requested and installed
Then go to https://[yourdomain] and confirm that your deployment is working.
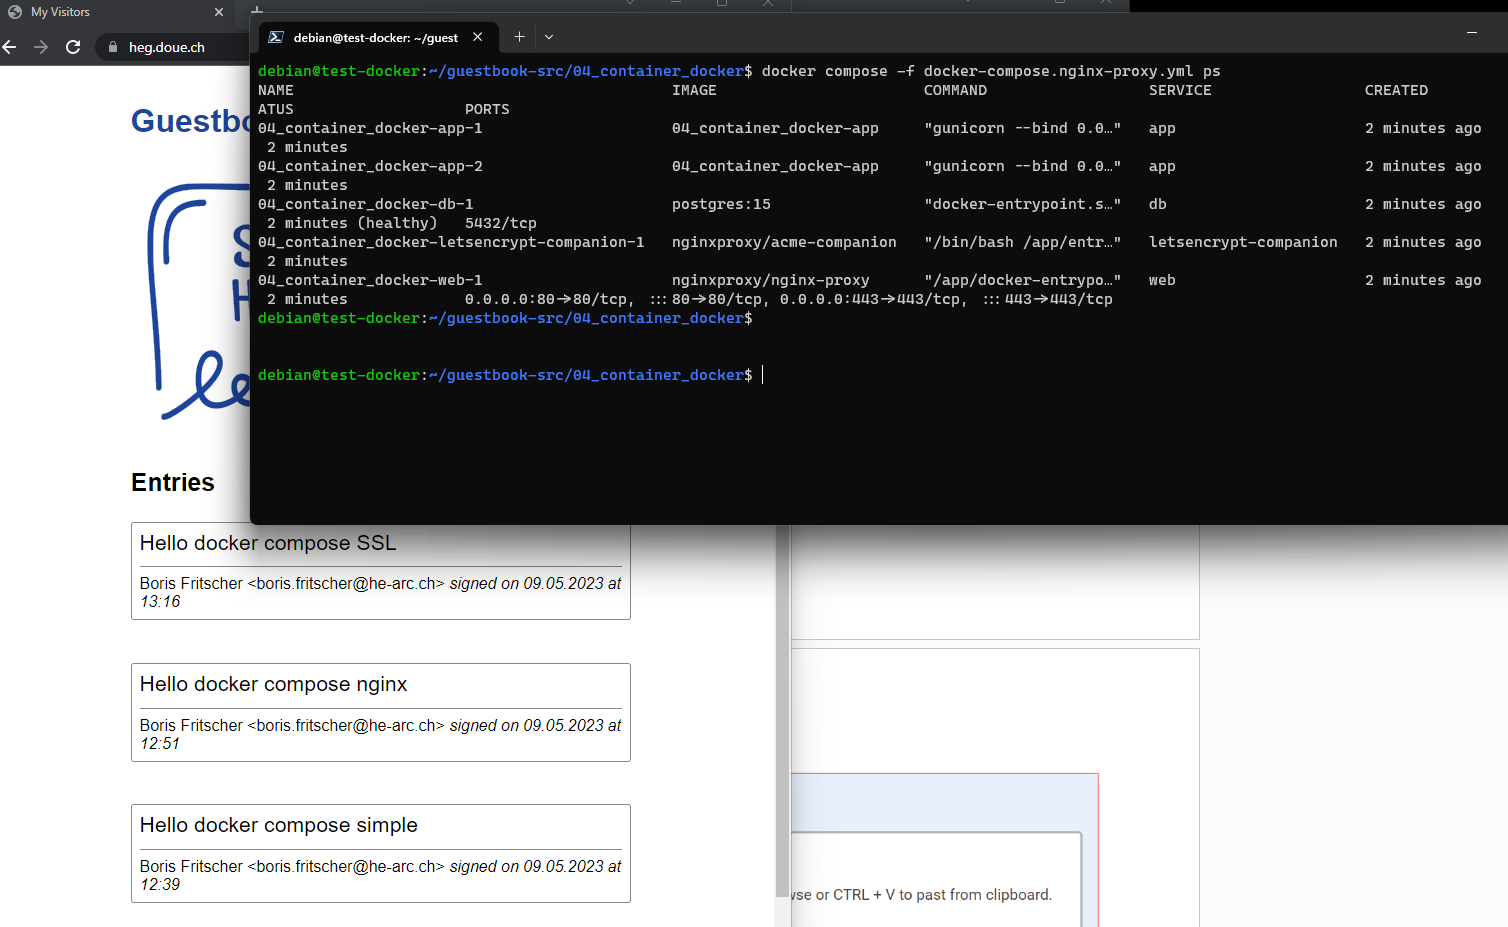
Task Progress Check
Take a screenshot from the application opened in your browser showing the messages and the output of the following docker compose command:
$ docker compose -f docker-compose.nginx-proxy.yml ps