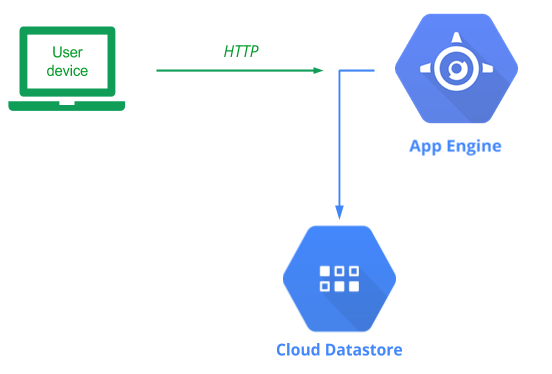
App Engine is a serverless platform (Platform-as-a-Service) that allows you to focus on writing an application, leaving the infrastructure management and deployment completely to Google Cloud. Since our application is likely to become extremely popular, being able to deploy it on something like App Engine will allow us to seamlessly scale when our service becomes popular. App Engine is very similar to Cloud Run, but in App Engine, GCP provides the environment (e.g. Python, NodeJS, Ruby) and all you need to do is provide the application code. In container-based services such as Cloud Run, you provide both the application and the environment (via a container).
Before we begin, we first need to understand what our application needs in terms of access to Google Cloud's services. As with most Google Cloud Platform services, a default service account with a set of permissions is automatically created when the service is enabled. For App Engine, the App Engine default service account is used when our application needs to access resources within the project. The service account takes the form of:
<GOOGLE_CLOUD_PROJECT>@appspot.gserviceaccount.com
In order to make development easy, this service account is given Editor access to the entire project. This allows your application full access to all resources on the project and if your application has a vulnerability that can be exploited, adversaries can use their access to fully compromise your project. Since our application requires only Datastore access, we will first reduce the privileges on the App Engine service account.
Option #1: Web console
To do so from the web console, go to the main IAM page:
On this page, find the App Engine default service account to see that it has been given Editor permissions. On the right hand side, click on the pencil icon to edit the permission:

Within the dropdown, replace the Editor role with Cloud Datastore User.
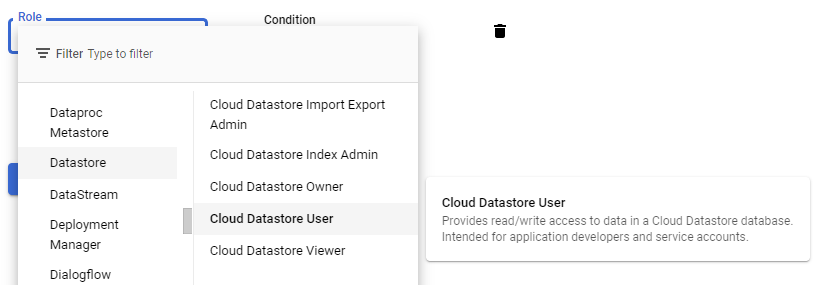
Click on Save and see that the role has been changed.
Option #2: Cloud Shell
To do the same via Cloud Shell, we can run gcloud commands to remove the Editor role and add the Cloud Datastore User role.
gcloud projects remove-iam-policy-binding ${GOOGLE_CLOUD_PROJECT} --member=serviceAccount:${GOOGLE_CLOUD_PROJECT}@appspot.gserviceaccount.com --role=roles/editor

gcloud projects add-iam-policy-binding ${GOOGLE_CLOUD_PROJECT} --member=serviceAccount:${GOOGLE_CLOUD_PROJECT}@appspot.gserviceaccount.com --role=roles/datastore.user
Bring up Cloud Shell and navigate to the source directory.
cd guestbook-src/05_gcp_datastore
In addition to the original application code, App Engine requires a single YAML file to specify how it will run your application app.yaml. YAML is a hierarchical mark-up language that is used prevalently in the cloud. As the app.yaml file below shows, we specify a Python 3 standard environment that runs gunicorn on our application in app.py on a PORT it is given. While App Engine typically auto-scales, we'd like to initially force it to bring up 2 instances. Finally, we can specify the machine types that will be used. In this case, we will be using f1-micro instances.
app.yaml
# Use Python3 standard environment
runtime: python311
env: standard

# Run gunicorn on app object in app.py
entrypoint: gunicorn -b :$PORT app:app

handlers:
  # This configures Google App Engine to serve the files in the app's static
  # directory.
- url: /static
  static_dir: static

  # This handler routes all requests not caught above to your main app. It is
  # required when static routes are defined, but can be omitted (along with
  # the entire handlers section) when there are no static files defined.
- url: /.*
  script: auto


# Spin up 2 instances
manual_scaling:
  instances: 2

# Specify machine type
resources:
  cpu: 1
  memory_gb: 0.5
  disk_size_gb: 10
App Engine automatically builds a container based on your application and its app.yaml configuration which is then deployed onto the infrastructure it creates.
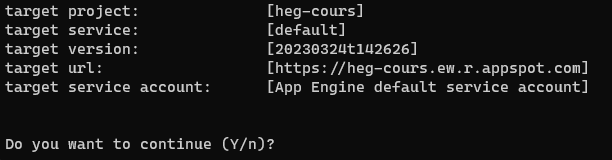
We can now deploy our code to App Engine. To do so, issue the following command from the directory containing the application and authorize Cloud Shell to allow it to perform the operation.
gcloud app deploy
When an application is deployed, App Engine will automatically create all of the infrastructure (e.g. Compute Engine instances, Load balancers, VPCs, subnets, etc.) to run your application. It will also automatically create a DNS name and a TLS certificate that will allow your application to serve itself over https. Wait for the command to complete and note the target URL that the application is now available at.
When the deployment is complete, visit the URL in a web browser. Sign the guestbook with your name and PSU e-mail address with the message "Hello App Engine!".
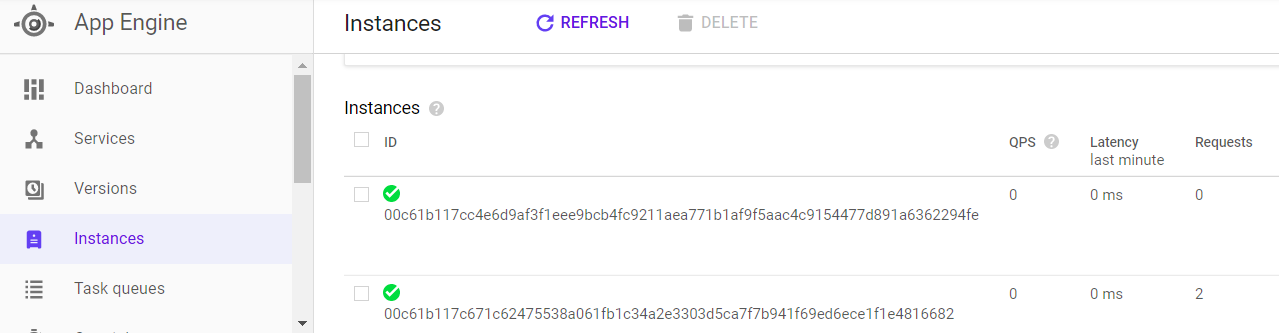
From the web console, visit the App Engine home page and click on "Instances" to view the machines that have been brought up to serve your application.
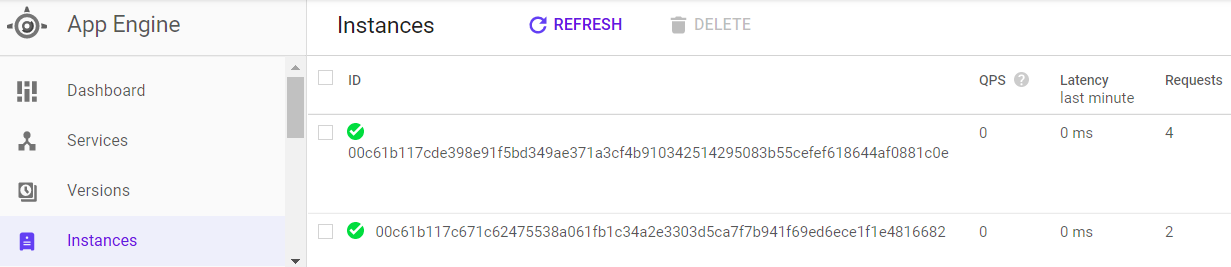
Click on one of the instances and delete it. Refresh the page and see how quickly it has been replaced by another replica in order to maintain the number of replicas specified in app.yaml. The beauty of managed platforms is that, as a developer or an operations engineer, you never have to touch any of the infrastructure to scale your application out or handle failures.
Task Progress
Take a screenshot of your google console showing the running App Engine instances and upload it below.
Change directory to the java version
cd guestbook-src/05_gcp_datastore_java
In addition to the original application code, App Engine requires a single YAML file to specify how it will run your application app.yaml. For your Spring Boot java application it is located under src/main/appengine. Only the runtime is required, but we use the same manual scaling setup as before.
src/main/appengine/app.yaml
runtime: java17
env: standard

env_variables:
  GUESTBOOK_SERVICE: "firestore"

# Spin up 2 instances
manual_scaling:
  instances: 2

# Use an f1-micro machine type
resources:
  cpu: 1
  memory_gb: 0.5
  disk_size_gb: 10
We can now deploy our code to App Engine. To do so, issue the following command from the directory containing the application and authorize Cloud Shell to allow it to perform the operation.
gcloud app deploy
When an application is deployed, App Engine will automatically create all of the infrastructure (e.g. Compute Engine instances, Load balancers, VPCs, subnets, etc.) to run your application. It will also automatically create a DNS name and a TLS certificate that will allow your application to serve itself over https. Wait for the command to complete and note the target URL that the application is now available at.
Make sure that two versions are running (Python and Java) and setup a random traffic split
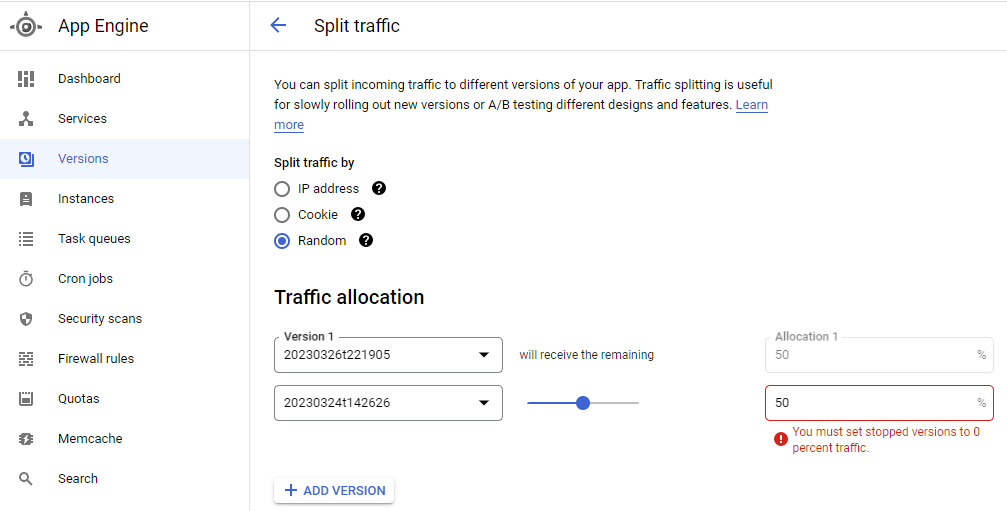
Refresh the guestbook page and see which versions replies.
Go to the App Engine console and click on "Versions". Select the current version of your application that is running your instances. Select it and click on "Stop"
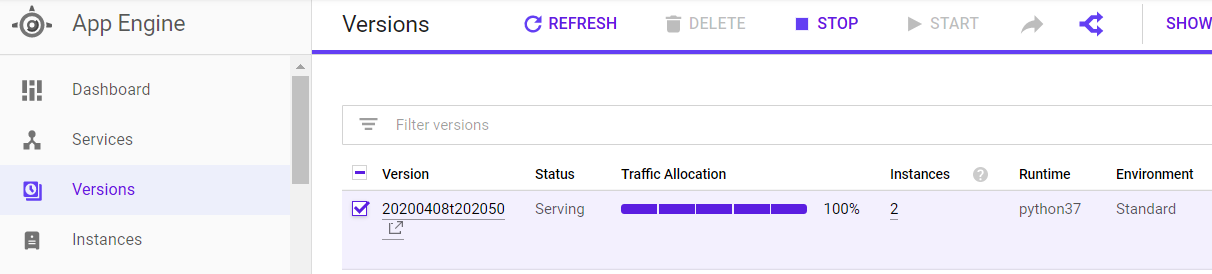
Click on Instances again to make sure there are none deployed.